Tips and thoughts

Saturday, 26 February 2011

Mung Poha Vada (Low Fat Mung Beaten Rice Dumpling)


Mung Poha Vada (Low Fat Mung Beaten Rice Dumpling)


My husband loves paruppu vada and fancies it very often. He would describe how crispy it should be, how there must be some finely chopped onions in it and how great it would be to eat. I will keep listening quietly and do not say I will make it anytime soon. While I know avoiding deep fried food is good for health I do feel bad about not making him something he enjoys so much. I then came across a mung poha vada recipe on a television show and adapted it to our taste and calorie preference. It is originally a deep fried recipe but I made it using my kuzhi paniyaram koodu. I also recently learned that a form of this utensil is used in western cuisine as well and is called Danish cake pan. I have always found it so easy to make several low fat dishes. Back to the vada, it turned out to be really yummy. I made it as a starter really and was not quite sure if I had made too much of it. It was so good that we finished it off quite easily. The rest of the meal was not particularly rich in protein while they had other goodies and hence it was a great contributor to our nutrition. It is a must try for all ages. Here is how I made it...

2/3 cup mung dal (dehusked split mung bean)
1/3 cup poha
2 green chillies
3-4 tablespoons finely chopped coriander leaves
Salt to taste
1 small red onion, finely chopped

Rinse and soak the mung dal for 1-2 hours. If using thin poha, it is adequate to soak it for ten minutes just before grinding, if using thick variety, soak for 1 hour.

Drain water and grind the dal, poha and chillies together to a coarse paste and finally add salt. Add only enough water to run the blades and final consistency should be such that you can just spoon the batter. Add onions and coriander

Heat the ‘kuzhi paniyaram koodu’ with less than a teaspoon oil in each of the pits. Add a spoonful of batter and cook until the bottom side browns and top side sets and then turn and cook until both sides are browned

Serve with or without chutney!

This vada did not even need all the oil I had put and that means it needed less than a teaspoon of oil!

Chettinad Coriander Rice


Chettinad Coriander Rice


After a long time we managed to drop all our routine chores and make use of a sunny day while the forecast said there could be snow soon. I was not keen on spending money for food and decided to have a heavy breakfast and skip lunch if possible. Indeed the plan worked and it was time to start making dinner when we came back home. I had watched this recipe on the tele recently and thought it was quite easy, quick and sounds tasty (that is a weird description!). I did not taste it until I set the table as I usually like the surprise element in how the dish has turned out. This one was very nice and most importantly my husband liked it. I tend to use both the stem and leaves of coriander as the stem has a great aroma and also goodness. Here is how I made it...

1 onion, chopped
Handful of curry leaves
Handful of coriander leaves, finely chopped
1 teaspoon mustard seeds
1 teaspoon cumin seeds
1 teaspoon channa dal
1 dry red chilly
1 cup rice cooked so grains are separate and fluffy
Salt to taste
Asafoetida
Turmeric powder

To roast and powder:
1 tablespoon coriander seeds
1 tablespoon cumin seeds
1 tablespoon channa dal
4-5 dry red chillies
4 cloves garlic
1 teaspoon black peppercorns

Roast all the ingredients mentioned above for the powder, cool and grind to a fine powder

Heat some oil in a kadai/skillet and add mustard seeds, channa dal, cumin seeds, dry red chilly.

Once the mustard seeds splutter, add the onions and cook until soft

Add curry leaves and chopped coriander leaves and cook until the coriander wilts

Add the powder and cook for couple of minutes more

Add rice, required salt and mix together


Serve!


You may find that you have a bit more powder than you need if you are serving two. Just store it in an airtight container and refrigerate and use later. I did not reduce the quantity of ingredients to adjust for just two people because the mixie/food processor may struggle to do a good job with too little in it.


Wednesday, 23 February 2011

Pasta with Homemade Roasted Tomato Pesto


Pasta with Homemade Roasted Tomato Pesto


The success of my attempt to make cheesy pasta bake gave me the confidence to explore a bit more non-Indian recipes. Barring a usual tomato sauce and also a cream cheese sauce, I have not tried making other sauces for pasta. Sometime back we used to try some bottled sauces once in a while and concluded we like a brand called Sacla. I just have a couple of small bottles handy to help me on very busy days. Although I buy few of these bottles, I refrain from using any processed food so this time I decided to try my own pesto. I wanted to start with a simple one but still wanted great results. This recipe turned out quite good and at the end I added some cheese to it (just because I had to finish a small block of it leftover) and baked it like before. You could totally avoid that or just add the cheese to the sauce itself and allow it to melt and not bake. You could also try adding parmesan cheese to the pesto itself until I come back with a low fat replacement for that. I totally skipped cheese in the pesto itself. It has probably been over a year since I last had wholewheat pasta for reasons like it did not taste great and also we were not pasta fans anyway. This time however, the wholewheat pasta was great and when combined with the pesto and veggies, it did not even seem like wholewheat and was just great.

For the Pesto:
18-20 cherry tomatoes (Use lesser quantity of normal tomatoes if cherry tomato is unavailable)
2 tablespoons almonds
3-4 cloves garlic
Handful of fresh basil
A dash of dried basil
Olive Oil
Salt

For rest of the dish:
1 Onion, cut into rather thick slices
Diced mixed vegetables (Use as much as possible and you like. I used red pepper, courgette, carrot, babycorn)
2 tablespoon tomato puree or used couple of tomatoes, diced
Some dried Oregano
Olive Oil
Salt to taste
Pasta of your choice (penne, fusilli or macaroni will be ideal)
Some grated cheese (optional)
To make the pesto:

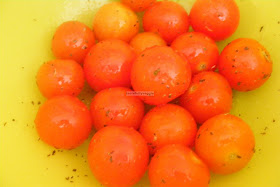
Put the cherry tomatoes in a bowl and add less than a teaspoon oil and mix to coat the tomatoes with little oil. Add a dash of dried basil and little salt and roast in a preheated oven at 190degC for 40 minutes

Once the tomatoes cool, grind it along with basil, almonds and garlic. You could use fresh red chilly to the pesto but I chose to add some chilli flakes to my plate later. Add about 2 tablespoon olive oil while grinding and do not add any water. You will have a bit of pesto left, just refrigerate it and use it later.


Rest of the dish:
Heat some olive oil in a pan and add onion

Once onions turn slightly soft, add the mixed vegetables and required salt and cook until vegetables are cooked but not too soft.

Add the tomato puree, pesto and about a glass of water and simmer until the raw smell from garlic goes away

Add some oregano and cooked pasta and it is ready to be served if you are not adding cheese

Transfer to an oven proof dish and add some grated grease on top

Bake in a preheated oven at 180degC for 20 minutes or until the cheese browns

Serve!

If you would like to add cheese and allow it to melt, do so before adding the pasta. Ensure the pasta is not mushy and salted adequately. Adding few drops of oil to the water helps to prevent the pasta from sticking together.


Tuesday, 22 February 2011

Low Fat Potato Fries


Low Fat Potato Fries


In America it is called French Fries and in UK it is called chips and the whole world loves it no matter what it is called. As a vegetarian, usually this is pretty much the only item on a typical McDonald or Burger King menu that I can order barring a cheesy burger. I have always thought they fry it in the same oil as they fry the fish in as it has an odd smell. For a person brought up the way I was brought up that is not an easy thought to stomach. Neither am I a person who willingly deep fries at home so there had to be another way to get my hands on these chips. I was watching Ellie Kreiger’s show on foodnetwork and came across this recipe. I could not get it right the first couple of times I suspect it was because I used normal potatoes while recipe calls for baking potatoes. At the end of the day, it did make a difference what potato I used as this time it was a great success and the whole family liked it. Here is how I did it...

2 baking potatoes, washed, peeled and cut into long finger like pieces
Salt to taste
1-2 tablespoon cooking oil

Mix the oil with the potatoes and place them on a baking tray lined with greaseproof baking paper ensuring all the potato pieces are laid in a single layer

Bake in a preheated oven at 200 degC for 15 minutes and reduce the temperature to 180degC and bake for further 5-10 minutes. Ensure you give them a stir mid way to ensure uniform cooking.

Add salt and serve!

Saturday, 19 February 2011

Brown Rice Vegetable Masala Dosa


Brown Rice Vegetable Masala Dosa


Right from my childhood I was brought up eating raw rice and same was the case for my husband. I would not even take even par-boiled rice except ofcourse when added to idli or dosa. You can then imagine how hard it must have been for us to try brown rice. Until now, I have not had the courage to replace white rice with brown rice in a dish like pulav or anything. However, as I am a very nutrition and health conscious cook, I knew I had to find them a place in our diet. The fibre in brown rice is said to help prevent colon cancer and gallstones. Brown rice has a lower glycemic index meaning it will release its caloric content slower and hence keeps one fuller for longer and also helps maintain stable sugar levels. For the world of benefits it offers I thought it to be appropriate to combine it with few other goodies. As everyone knows a meal is not balanced without vegetables. So this time rather than making masala dosa with usual potato stuffing I decided to add more veggies and left few potatoes chunky to make it look like regular masala. I also made coconut chutney as I did not have time for any other chutney that evening. Here is the recipe for dosa and vegetable masala.

For the dosa:
½ cup brown rice
½ cup par-boiled rice (idli rice)
¼ cup black lentil (urd dal)
¼ poha (beaten rice)
1 teaspoon fenugreek seeds
Salt to taste

Soak all ingredients together overnight. Grind it together to a fine batter adding required water and then add water. The consistency should be similar to idli batter so you can add more water later.

Allow the batter to ferment overnight. I let it out for two nights as it was cold here and it needed a bit more time

To make the dosa, spread a ladle full of batter on a hot pan and add little oil around the dosa. Flip the side once the top sets and edge appear brown and cook for a minute or less

For vegetable masala:
2 small potatoes, boiled, cubed
1 cup boiled vegetables (I used frozen mixed veggies, carrot, peas, beans, corn)
1 tomato, chopped
1 onion finely chopped
2 green chillies, slit
1 inch ginger, grated
Some curry leaves
Turmeric powder
1 teapsoon mustard seeds
Asafoetida
Salt to taste
Cooking oil

Heat a little oil and add mustard seeds. Once it crackles, add onions, ginger, green chillies, turmeric powder, curry leaves and asafoetida

Once onion turns soft, add the tomato and a pinch of salt.

Once tomato becomes mushy add the vegetables and potato and mash it coarsely. I did not want them too mashed, especially the potatoes.

Add required salt and cook for a couple of minutes.

Once both sides of the dosa are cooked, please about a tablespoon of the vegetable masala on one side of the dosa and fold over. Serve with a nice chutney!


The dosas came out evem better than restaraunt dosas and I was delighted. It was indeed very filling. You can make around 10 dosas with the said quantity.

My wee one had a special dosa, cat again!

I am sending this to wholesome wholegrains event hosted by http://www.cookingwithsiri.com/2011/01/wwc-brown-rice-for-dinner-event.html. Here is the main event and this month Siri is hosting the event for wholegrain rice dinner recipes.

Friday, 18 February 2011

Baked Tofu Manchurian

Low Fat Tofu Manchurian


It came as a surprise to me when my husband said he does not like Manchurians. I did not know until my mom made it one night for me when I was pregnant and I noticed he was not having any. The last time I made soya Manchurians, I did take a chance because if he did not like it I might have had to bin some of it. Luckily he liked it and I decided to take a chance again this time with tofu though. I must admit that I was really sceptical about tofu. I had bought a pack of it when I was in the exploratory mood and until its best before date I was not quite sure what to do with it. I know it is called ‘tofu paneer’ but I always thought it was unfair to call it so as it was nowhere as nice as paneer. This pack of tofu made me change my mind. Unfortunately the pack did not say whether it was silken or firm but I can say that it was divine. It is called Cauldron Foods Tofu. When I was in the States on my own I used to make tofu dishes but they would be quite dry and I would finish them just for the sake of eating. Anyway, this dish was very good and best part of it is it is a low fat dish. A must try!

2 teaspoons corn flour
2 teaspoons flour (maida)
¼ teaspoon chilly powder
Salt to taste
1 cup tofu, cubed
1 medium onion, diced
½ pepper (green, red or yellow)
2 green chillies, slit
2 tablespoons tomato ketchup
2 tablespoon soya sauce
4 cloves garlic, finely minced
1 inch ginger piece, cut to thin strips
Cooking oil

Combine the corn flour, flour, chilly powder and required salt and add water to make a ‘not so thick’ batter

Put some tofu cubes in the batter and gently mix them so that all sides get coated with the batter and place the cubes in a greased oven proof dish and repeat until you coat all the tofu cubes. I did not want a thick covering on my tofu so I made a rather thin batter. This helped me get a crisp outer and real soft texture inside the tofu.

Bake this in a preheated oven at 190degC for 30 minutes and just move the tofu cubes once or twice while it is baking. They will just start to brown and that should be adequate

In a wok, heat little oil and add onion, pepper, chillies, garlic and ginger. Cook until onions seem done and peppers become slightly soft but still have a bite

Add the ketchup and soya sauce and baked tofu cubes. You need not necessarily keep the flame on at this stage

Check for salt and add more if need be. Remember that soya sauce may have some salt so always check before adding.

Serve!

It is a great starter and also a great side dish for rotis or chapattis. If you do not have an oven, you can shallow fry in a tava on a slow flame.

Thursday, 17 February 2011

Masala Corn Rice


Masala Corn Rice


I realised that lately I have not been including an awful lot of information about the key ingredients used in the recipe. So I thought I will talk a bit about the hero of this recipe, corn. I must say that I was pleasantly surprised to know how much goodness this innocent corn has. Corn is suppose to be rich in thiamine and niacin. The native Americans are said to have consumed it with limestone ash as this combination helped the body absorb the niacin better. It also has beta carotene making it very beneficial for vision. The fibre content is also significant enough to alleviate digestive problems like constipation. I realise why I did not think corn had such great benefits – it is because it tastes great as well! Usually healthy ingredients aren’t the most appealing to the palate or in other words the unhealthy ones seem more appealing. Ofcourse that does not apply to this dish as it has the goodness and tastes good. I saw the basic recipe on a show on the tele and adapted it slightly to suit our taste and pantry. Here is how I did it...

2 red onions
4-5 dry red chillies (increase or decrease as per taste)
Handful of cashew nuts
1-2 inch piece ginger
4-5 cloves of garlic
2 cups corn, cooked
1 tablespoon coriander seeds, roasted
1 teaspoon cumin seeds, roasted
1 cup rice, cooked ensuring grains remain separate and fluffed
Salt to taste
Cooking oil

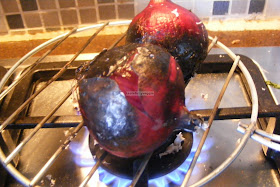
Do not peel the onions. Cook the onions on direct flame until it becomes soft to touch. Then peel and wash it

Grind the onion, red chillies, garlic, cashewnuts, ginger, coriander seeds, and cumin seeds to a smooth paste.


Heat tablespoon oil and add this paste and cook until raw smell goes and it comes together

Add corn, required salt and then add the rice and mix well

Serve with raita or a curry