Tips and thoughts

Thursday, 14 June 2012

Kala Channa Cheese Balls


Kala Channa Cheese Balls
With the hope to make healthy snacks for afternoon tea, I try to soak legumes and had kala channa soaked. I must admit that I am not a big fan of it but respect it and eat it for the wealth of goodness it possesses. I had pressure cooked half of it and left another half to sprout. I was wondering what to make with it while thinking of a good breakfast for my wee one and myself too. He likes to have baked beans but I do not like giving him the same food everyday. It then occurred to me that I could sneak kala channa into his breakfast. Normally, I would not give him kala channa or any channa as it is a choking hazard at his age but this recipe calls for grinding the channa making it safe. I wanted it to be a wholesome dish so combined carbohydrates in the form of potato, calcium from cheese and ofcourse protein from cheese and the channa itself. The channa is also rich in fibre and when combined with aromatic coriander leaves which are rich in minerals, it was a superb combination. It was neither too heavy nor too light and helped us keep full until mid morning snack. It is important not to fill a toddler’s tummy with just one meal and better to stagger the intake throughout the day. Same applies to us also but I must admit it is a struggle sticking to that regime while having a house to run and child to care for. I made this recipe very recently and while there are almost a hundred other recipes to be drafted and posted, this has jumped the queue really because I thought it would be a good dish for parents to give their little ones and ofcourse nourish themselves. Sticking the wee toothpicks makes it more attractive to wee ones and helps them gobble the dish!

½ cup cooked kala channa
1 medium sized potato
Handful of coriander leaves
1 teaspoon coriander powder
1 teaspoon cumin powder
Salt to taste
Turmeric powder
½ teaspoon chilly powder (optional)
2 heaped tablespoon grated cheese
2 heaped tablespoon all purpose flour
Cooking oil

In a food processor, bring together the kala channa, potato and coriander leaves and blend but do not add any water. The consistency should be such that it forms a ball when held together. To achieve this you need to ensure you drain the channa and potato well to avoid them forming a paste

Add the cumin powder, turmeric powder, salt, cheese, coriander powder and mix well

Make a runny paste by bringing the flour and water together

Make balls of the channa cheese mixture and dip in the flour paste to coat uniformly

Cook with little oil in kuzhi paniyara koodu. If you do not have one, make patties and cook on hot tava with little oil

Serve hot!


Wednesday, 13 June 2012

Garlic Kuzhambu (Garlic in tangy spicy sauce)


Garlic Kuzhambu (Garlic in tangy spicy sauce)

This recipe is literally brought to you hot from my kitchen because I just made and enjoyed eating it and also because I made it real hot. So be warned, if you do not like hot food, reduce the quantity of dry red chillies used. I fancied some hot food from last night, Schezuan fried rice to be precise but it was a little late to get started so just had some rice mixed with home made mango pickle. I was surprised to note that my craving for hot food did not go away with my sleep and now wanted something more South Indian. Garlic kuzhambu i.e. garlic in spicy tangy sauce had been on my mind for a while. Coming from an Iyengar family, this certainly is not my mom or grandmom’s fort so looked out for recipes. I then put together what would suit my taste buds and it was spot on, atleast for me. Some people do not eat garlic at all but there are a few who would not mind eating it as long as it does not smell too much. This dish is suitable for the latter as the dish itself is quite aromatic but does not have the garlic giving out its garlicky smell. I loved it and this certainly is a keeper. Here it is, for you to try...

1 garlic, peeled
1 teaspoon tamarind paste
1 teaspoon jaggery
1 sprig curry leaves
2-3 dry red chillies
1 teaspoon mustard seeds
1 teaspoon urd dal
¼ teaspoon fenugreek seeds
Gingelly oil or any other cooking oil
Salt to taste
Asafoetida
Turmeric powder

For paste:
1 teaspoon black peppercorn
½ teaspoon cumin powder
2 teaspoons coriander seeds
6-8 dry red chillies
3 cloves garlic
½ teaspoon fenugreek seeds
Little cooking oil
To make the paste, heat little oil and fry all the ingredients mentioned for paste on low flame until the seeds begin to pop and it is all aromatic. Keep aside and grind to smooth paste

Heat some oil and add mustard seeds, urd dal, fenugreek seeds, dry red chillies, asafoetida and turmeric powder. Allow the mustard seeds to crackle

Add the garlic cloves and curry leaves and sauté for couple of minutes

Add little over a cup of water and the tamarind paste. Also add required salt. Cook until the garlic softens and water is reduced by half

Add the paste, jaggery, top up some water and allow to simmer for about ten minutes, by this time, your kitchen will be filled with aroma

Serve with steamed rice or idli/dosa.


Sunday, 10 June 2012

Pavakkai Thokku (Bittergourd Thokku)


Bittergourd Thokku

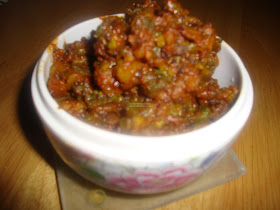
Believe it or not, I love bittergourd because it is bitter and presents quite a challenge to make a palatable dish. What makes the vegetable exciting is that the dishes usually need sweet, sour and heat in them so you mask the bitterness to a large degree. Some say very dark green bittergourd are too bitter and best avoided. It is a shame that such a medicinally rich vegetable is not even known in this part of the world. The juice of this vegetable is extremely good to keep blood sugar controlled. I wanted to do something different with this vegetable this time and thought making it like a pickle, i could mix it with rice or eat it with curd rice. I had some spice powder left from making the ennai kathrikai kuzhambu so I have used that in this recipe. Click here to see the ingredients for the spice powder. I quite liked the outcome so here it is for you...

2 bittergourd, seeded, halved and cut
1 teaspoon mustard seeds
Asafoetida
1 teaspoon tamarind paste
Turmeric powder
Salt to taste
1 teaspoon spice powder
½ teaspoon chilly powder
1 tablespoon jaggery
Heat a kadai and add the bittergourd, tamarind paste and enough water to immerse the bittergourd and boil until bittergourd is just done. Drain the liquid and take a ladle and keep poking into the bittergourd so it gets cut into smaller pieces


Heat some oil in the kadai and add mustard seeds. Once it crackles, add turmeric powder, asafoetida and the bittergourd

Add salt, chilly powder, jaggery and mix well.

After all of them come together, add the spice powder and cook for couple of minutes

Serve


Friday, 8 June 2012

Dhaniya Rice (coriander seed rice)


Dhaniya Rice (coriander seed rice)
For sometime now lunch menu has been regular south Indian items like sambar, rasam, mor kozhambu etc. I needed a break from that and fancied a variety rice, but again something different and not usual puliogare or lime rice etc. I came across this recipe on a television program and thought it was quite interesting. I already have a chettinad coriander rice on my blog but this one is different as it uses coriander seeds more than leaves. The recipe mentioned below is enough to mix rice for about 6 people, I only used half of it and stored the rest. I used about 8 red chillies and also used couple more to temper and I must say it came out like Indian Schezuan rice and I quite liked the heat along with the dhaniya flavour. You could reduce the red chilly according to your taste. If you fancy, you could sauté some onions as well to mix with the rice. I served it with eggplant-fenugreek seeds raita so we get some vegetable in the meal as well as have the yogurt compensating for the heat.

4 tablespoon dhaniya seeds
1 ½ tablespoon urd dal
1 tablespoon channa dal
2 tablespoon chopped ginger, finely chopped
6-8 dry red chillies
2 green chillies, finely chopped
1 teaspoon mustard seeds
Turmeric powder
Asafoetida
2 tablespoon chopped coriander leaves
Salt to taste
Rice, cooked

Heat little oil in a heavy bottom pan and fry urd dal, channa dal until golden. Fry dhaniya seeds until aromatic and dry red chillies until crisp. Keep aside to cool and grind to powder

Heat some oil and add mustard seeds. Once it crackles, add turmeric powder, asafoetida, green chillies, ginger, curry leaves and sauté

Add about 3 tablespoons of the ground powder and fry for couple of minutes

Add rice enough for about three people, add salt, coriander leaves, mix well.

Serve with raita/pachadi

Wednesday, 6 June 2012

Sweet Potato Chutney/Thogayal


Sweet Potato Chutney/Thogayal


Some days I try making recipes that I have no idea how it will turn out. While most recipes I try would give me a hunch that it will come out ok and I do not have to bin it, some do not give me that warm feeling. I still try a few of them because I think as a food blogger, it is my role to try and share what has been successful so you can enjoy it too. This time it was sweet potato chutney that I saw on a television program. I certainly remember sweet potato being one of the vegetables you can give a baby just as you start them on solids. The thought of grinding cooked sweet potato somehow gave me the fear of making baby food, not particularly appealing to adults, is it? I then decided to tweak the recipe to give it a better consistency and aroma. I added urd dal to it, similar to few other thogayals that mom would make. With great doubt, I mixed it with rice and tasted and then all I did was go for seconds. I loved the outcome! The generous amount of tamarind flakes imparted a great sour taste and when combined with the sweetness from the sweet potato, it was awesome. This dish has sweet, sour and heat in it. I did not grind the urd dal mixture very fine to impart some texture but that is upto you. If you do not take garlic, replace that with ginger. Remember that sweet potato actually counts as one of five a day vegetable unlike the normal potato. I have heard/read that when consumed with the skin, it helps prevent retinopathy in diabetics.

1 sweet potato
4 green chillies
A small ball of tamarind flakes
3-4 cloves garlic or replace with some ginger
1 tablespoon urd dal
Salt to taste
Cooking oil

Heat little oil and fry the urd dal until golden, keep aside

In the same pan, add green chillies and garlic and fry until raw smell goes, keep aside

Add cut sweet potatoes, required salt and keep sprinkling water every now and then and cook the potatoes until done. Cool

Grind all together along with the tamarind flakes. To make grinding process easier, grind urd dal, chillies, garlic and tamarind first then add sweet potatoes. Try not to add too much water.

Serve with piping hot rice or idli, dosa or use as a spread in sandwich!


Tuesday, 5 June 2012

Vanilla Cake with Butterscotch Frosting (Eggless)


Vanilla Cake with Butterscotch Frosting (Eggless)
This cake is special for two reasons, it was made to celebrate my sister-in-law’s birthday and secondly, this was really my first attempt at cake decoration. My wee one had been watching me decorate and could not wait for his aunt to arrive and cut the cake, although he said he wants to cut the cake no matter whose birthday it was. I was trying to take extra care and improve on the final product so this time I chose to go for ‘cake flour’ instead of just plain flour. I do not get cake flour here so decided to make my own by substituting two tablespoons of plain flour with corn flour for every cup of flour. You could use just plain flour but it is said that the starch in the cornflour gives better texture to the cake. I searched online quite a lot to get hold of good frosting recipes that were eggless and chose a butterscotch frosting. I could have made it a bit thinner so it was a bit more creamier once well set but it was ok the way it came out too.

2 ½ (minus 4 tablespoons) cups all purpose flour
4 tablespoon cornflour (skip if using 2.5 cups of flour)
2 teaspoons baking powder
1 teaspoon baking soda
1 tin condensed milk (397g tin)
2 tablespoon vinegar
2 tablespoon vanilla essence
½ cup melted butter
2 pinch salt

If you wish to make your own cake flour then remove four tablespoon of flour and replace that with four tablespoon corn flour. Sift the two together atleast twice. If you wish to use only all purpose flour, then just take 2 ½ cups of the flour

Sift the flour together with baking powder, baking soda and couple of pinches salt

Make a well in the centre and add the condensed milk, vanilla essence, melted butter and about a cup of water. Mix until just combined, do not overmix

Add the vinegar and mix very briefly. Quickly transfer to a baking paper lined cake tin, give it a few gentle taps to get rid of excess air bubbles and bake in preheated oven at 180degC. Baking time would be between 25 to 35 minutes depending on oven. Check if done by inserting a skewer in the middle and see if it comes out clean.

Cool the cake in the tin for five minutes and then transfer to cooling rack

Allow it to cool completely

Butterscotch frosting:
350g icing sugar
75g butter
25g soft brown sugar
3 tablespoon milk

Put the butter, brown sugar and milk in a bowl and double boil until sugar and butter are melted

Take off the flame and add the icing sugar and mix well. This consistency was ok for me to use as frosting, if you are using as icing, add little bit more water and use.

Spread it evenly on the cake once the cake is completely cool. I cut the top crust of the cake so it is more uniform.

Then put icing as desired. I just followed the icing sugar packet instruction. I also melted some chocolate with couple of spoons milk to drizzle on top.


Sunday, 3 June 2012

Eggless Brownies


Eggless Brownies


I had a packet of chocolate that I had to use up soon as it was approaching end of its shelf life, which is the very reason I got it at a very low cost. I was wondering if I should make biscuits but was not sure I had the energy to grate it to add it to the biscuit. Any other quicker way of doing it would have been my first option. I looked up some eggless brownie recipe. To be very honest, I am not a big fan of brownie or even chocolate cakes available in the market. Main reason is that I find them way too fatty and greasy and I get put off by the sight of them and also the feeling of full that I get after eating it. On the other hand, my husband has tried many brownies and chocolate cakes so he is the one I rely on to get genuine feedback on such dishes. I decided to make brownies but my lack of knowledge about how it needs to be made me wonder if I had indeed baked brownie or just chocolate cake. However, I tasted it myself a little later and was convinced it was not chocolate cake and confirmed that my husband was not just trying to flatter me by saying it was very good. Brownie, as I understand is suppose to have a rather crisp top and slightly gooey in the centre. For that reason when you check it is done, don’t expect a skewer inserted t come clean, it should come back slightly sticky but not with raw batter. I sprinkled some icing sugar to make them look even better. Here is the recipe...

1 cup flour
1 teaspoon baking powder
3 tablespoon coco powder
150gm chocolate, preferably dark
½ cup caster sugar
1/3 cup oil/butter/margarine
½ cup plain yogurt
1/3 cup water
Melt the chocolate in double boiler

Sift together flour, baking powder and coco powder and add sugar

Whisk together yogurt, oil/melted butter/melted margarine until combined

Add the flour mixture and mix until just combined, add water to make a batter similar to cake batter

Pour this into a square or rectangular dish lined with aluminium foil and bake at 180degC for 35-40 minutes. A skewer inserted should not come completely clean but a bit sticky.

Cool in the tin/dish for five minutes and transfer to cooling rack with foil removed. Cool completely and cut into pieces