Showing posts with label Snack. Show all posts

Saturday, 2 August 2014

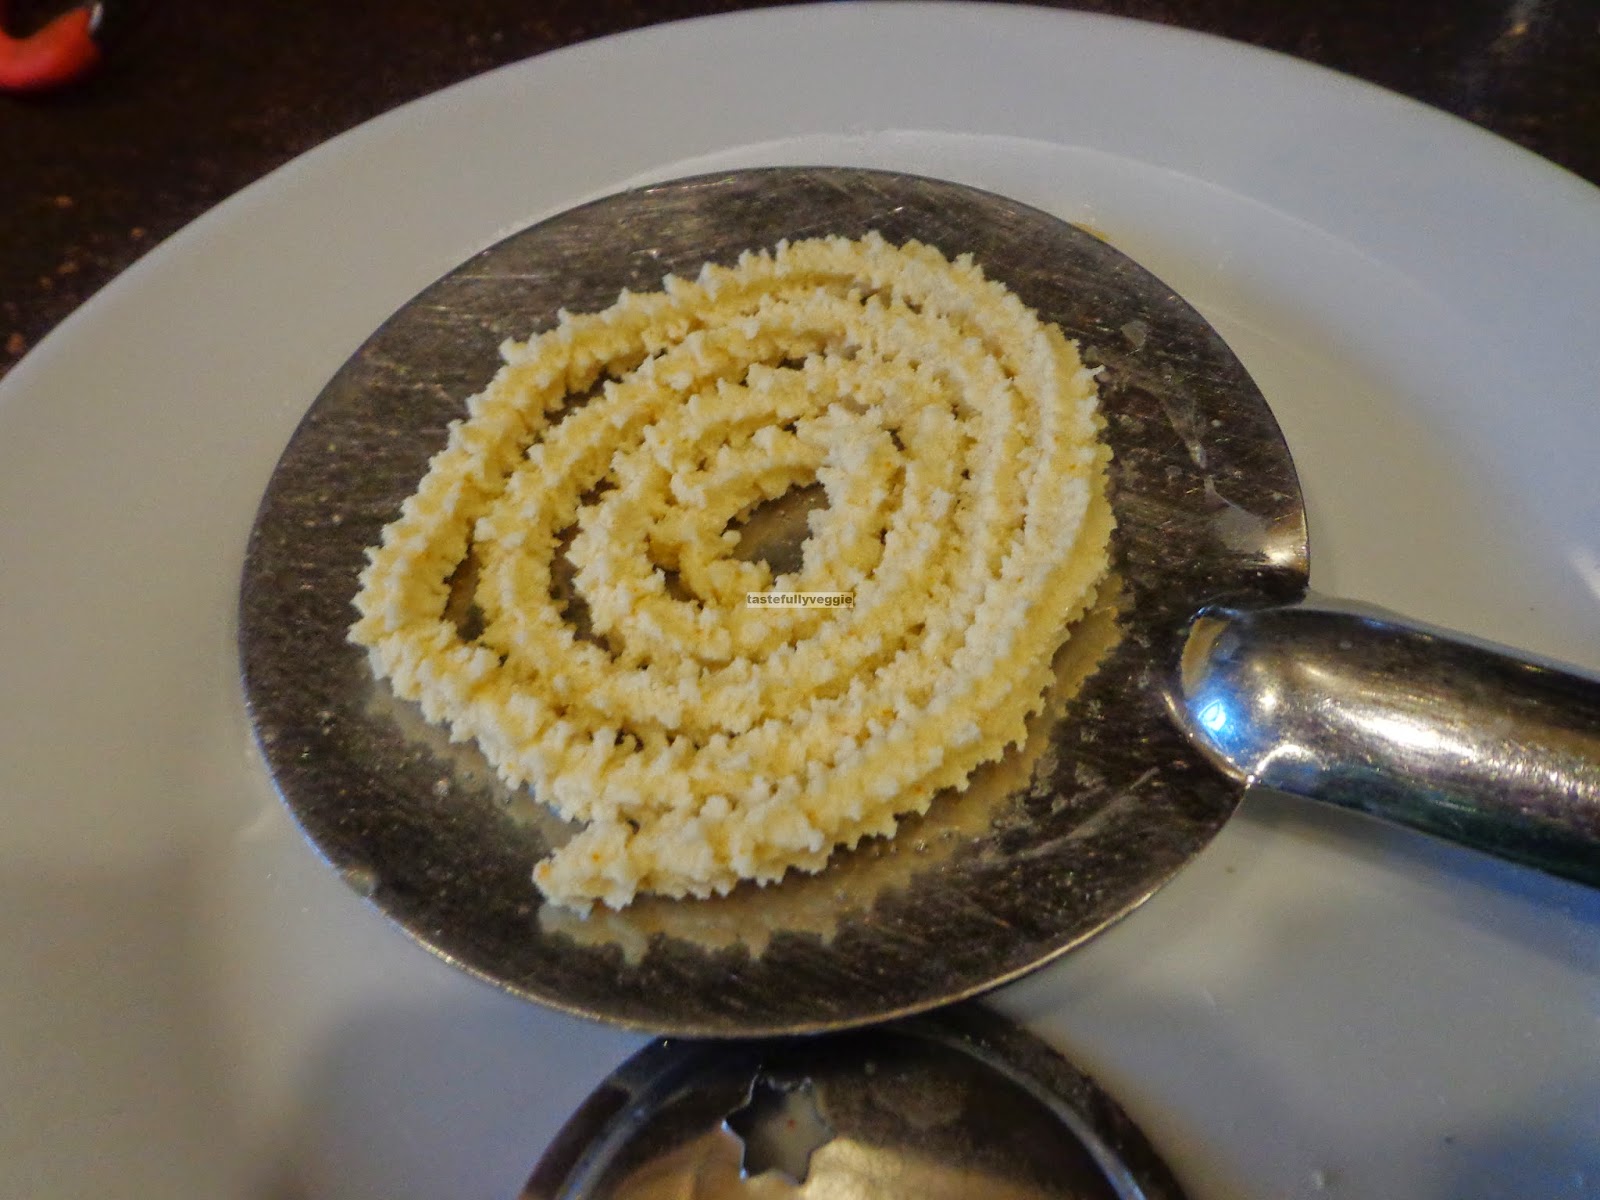
Chakli (Mullu Muruku)


Chakli
It is summer holiday for school now so for the first time, my son is at home. Crispy snacks can always come handy when you have a bored young child around. Rather than buying them, I thought I should give it a try myself. Afterall, it may not hurt too much to fry now and then. I picked something easy and this was it. Also, my son’s friend’s gran had made this and after trying them my son asked me to make some. What I loved about what I made is it tasted quite like ‘kai muruku’, the one shaped with hand without the labour of sitting down to shape them. Hope you like it as well. It is one of the 'batchanams' made for Krishna Jayanthi and even Diwali. Here is the recipe...

3 cups rice flour (I used store bought rice flour)
1 cup besan flour
Salt to taste
Dash of asafoetida
1 teaspoon chilly powder
3 tablespoon oil
1 teaspoon ghee
1 tablespoon white sesame seeds
Oil for deep frying

Sift the flours together and add chilly powder, asafoetida, sesame seeds and salt

Heat the three tablespoons of oil, ghee and add it to the flour mixture and mix to form crumb like consistency. Heated oil and ghee are used to amke sure the murukus come out crispy. Rather check the seasoning at this stage than later


Add water slowly to make a soft dough. The dough must be soft enough to be able to be forced through the mould. Rather add water little by little so it does not become to soft. Also, check the consistency by putting it into the mould and see if it comes out without problem. What you do not want is, hard dough struggling to come out and eventually forces the mould open and falls into hot oil splashing it all over you and the kitchen!

Use the star shaped mould and make murukus on a ladle as shown. This can be slipped into hot oil for frying. Check if oil is ready by putting a small piece of dough in. It is ready if it emerges up quickly. It does not have to be perfectly shaped, so you can even press it directly into the oil in random shape.


Fry both sides until golden, drain and keep aside


Cool completely before putting in airtight boxes.


Saturday, 16 November 2013

Corn and Spinach Pops


Corn and Spinach Pops


I saw a recipe on Tarla Dalal’s website and knew I wanted to try it. I was quiet sure I could not follow the recipe to the letter as it involved many steps and would have taken a few dishes to make it. I decided to simplify it and make my way but keeping the essence of the dish. The original recipe suggested making white sauce with plain flour, I replaced this with mashed potato to provide the binding as potato is complex carbohydrate. Ofcourse, I also skipped the deep frying and stuck to my method! I made it as an after school snack and thought it as a kid’s recipe but how wrong I was. I could have helped myself to more if only I had made more. It was a hit with my son

1/3 cup corn
1 large potato, cubed
Handful of spinach, washed
¼ cup grated (cheddar) cheese, could add bit more if needed
½ teaspoon jeera powder
Salt to taste
Turmeric powder
1 cup bread crumbs
Cooking oil
Breadsticks

Boil potato in a pan and once it is nearly done, add corns and boil until cooked. Then add washed spinach and boil for couple of minutes


Drain and let this cool just so you can touch. Mash the mixture after adding jeera powder, turmeric powder, salt and cheese. Make sure you do not add too much salt as cheese tends to be salty as well. If it is a bit too soft and you are unable to make balls, add some breadcrumbs so it absorbs moisture. Mixture should now be like soft dough

Make little balls, about lime size, roll in breadcrumbs and fry with dots of oil in kuzhipaniyaram koodu (Danish cake tin I think). Once it gets a nice golden colour on all sides, put them on a plate and insert breadsticks to make them like lolli pops


Serve!

Sunday, 20 October 2013

Chocolate and Cherry Palmiers


Chocolate and Cherry Palmiers
Palmiers or elephant ears, is a dish of European origin, not sure if it is French or Germans that originated it. Does no really matter as it just tastes so good you would not want to research the origin but just the recipe. These are so easy to make if you have puff pastry in your fridge. I do not make my own puff pastry and hey, don’t judge me for that, even the best of bakers like Mary Berry and Paul Hollywood once confessed they don’t either. I actually made them for the first time to offer to my son’s friends who were meant to visit us for navaratri. However, I had to cancel their visit due to my daughter’s illness. Anyway, the point is that even if they had come, I did not make near enough of these as it turns out. They literally go flying and I kept making them throughout navaratri as we had a constant flow of guests. This is one version of this dish and I intend to post more of these so you get a variety of flavours.

½ sheet of puff pastry
2 tablespoon or so of chocolate spread like nutella
5-6 glace cherries, chopped

Spread the puff pastry sheet and smear it with the chocolate spread evenly, upto the edges. Dot with glace cherries here and there and use more if you want.


Roll both sides of the pastry so each half then meets at the centre, gently press. Wrap it and refrigerate for atleast 30 minutes or put in freezer for 10-15 minutes. This is important as puff pastry always needs to be cold and has to go in a very hot oven, else, it will not puff.


Cut into about 1.5cm thick slices and place on lined baking tray with good space between them. Bake in a pre-heated oven at 200degC for about 8-10 minutes, until golden.


Cool and serve!


Friday, 5 July 2013

Custard and Fruit Tart (eggless and low fat)


Custard and Fruit tart
I was looking for custard recipes just to use up the box of custard powder and reclaim shelf space. However, now I wonder if custard powder will become a staple in my pantry as it is so great to make quick and tasty desserts. Unlike traditional tart shells, I adapted Tarla Dalal’s recipe to make a low fat shell. If you wish, you could even use store bought short crust pastry or refer to my earlier post on shortcrust pastry.

Here are few things you need to keep in mind while dealing with shortcrust pastry:
  • Do not knead the dough too much. The idea is not to make the gluten form else the pastry will not be crumbly
  • Try to refrigerate the dough for few minutes, wrapped in film or just in an airtight box
  • Do not stretch the dough while rolling to make it fit the tin. The pastry will shrink in the oven so the more you stretch now, the more it is going to shrink. Instead, roll out the right dimension and fit properly
  • Before blind baking, prick with forks so it does not rise. Also put greaseproof paper and some baking beans or any other beans or rice. The weight of this will prevent the pastry from rising.
  • After putting the pastry in the mould, you could refrigerate it before baking. This is particularly helpful when you use pastry with more fat than the recipe here. This helps the butter stay cold and takes a bit longer to cook in the oven. This is said to help result in a more crumbly shell.
 I think this is a yummy, fresh and rather light dessert, just perfect for this summer. Recipe here...

For tart
¾ cup flour
2 teaspoon butter
1 tablespoon custard powder
1 tablespoon sugar
Pinch of baking powder
Required cold water

For custard
1 ¼ cups milk
2 tablespoon custard powder
2 tablespoon sugar
Loads of fruits

To make the tarts:
Combine the sugar and butter

Sift together the baking powder and flour and add the custard powder and sugar. Add required water to make a soft dough


Roll into about 3 mm thick disc and line on tart tins. If you do not have tart tins, use muffin moulds to make wee cups.

Prick in a number of locations and bake in preheated oven at 200degC for 15 minutes, until golden brown. Cool


For custard:
Dissolve the custard powder in about quarter cup of milk and heat the rest of the milk, do not let it boil


Add the custard powder and milk mixture to the heated milk and keep stirring until it thickens and coats the back of the spoon. Add the sugar


Once custard cools down, pour into the tart shells and refrigerate until set. Serve with loads of fresh fruits like berries.


Thursday, 20 December 2012

Paneer Cigar Roll (non fried)


Paneer Cigar Roll (non fried)
The last time I made paneer cigar rolls was for my son’s birthday celebration last year. It was loved by everyone and was a hit. After that though, I somehow never got to make it again, probably because I have just not had the time and energy for it. Not to say it is energy consuming but because it involves deep frying. This time though I tried my hands on baking it. I felt that if home made dough was used for the pastry then the results may not be very satisfactory so chose filo pastry. For those who do not have access to filo pastry, make a dough with about a cup of all purpose flour (maida) with required water and couple of spoons of oil. Roll the dough as thin as possible and that is almost as good as filo pastry substitute. You can see from the pictures that they look more like the huge cigar rolls than the sleek cigarettes, am sure you can do a better job of rolling them, I had far too many things going on including a crying baby. Paneer is Indian cottage cheese. You could use other cheese like cheddar or mozzarella too. As these will melt, so not add it to the pepper on the stove, mix it after the pepper has cooled down a bit. I made my own dip by mixing hot an d sweet sauce, soya sauce, garlic infused olive oil and sugar. The below mentioned quantity makes about 9 rolls.

100g paneer, grated
1 large red pepper, finely chopped
3-4 spring onions, green and white part finely chopped
½ teaspoon coriander powder
½ teaspoon cumin powder
Turmeric powder
½ teaspoon chilly powder
Salt to taste
6-8 sheets of filo pastry
Cooking oil

Heat some oil and sauté the spring onions for couple of minutes

Add the peppers and add required salt and cook just until if begins to soften

Add the paneer, turmeric powder and spice powders and sauté for couple of minutes

Take two sheets of filo pastry and brush with little oil and cut into three equal parts across its length

On one end, put some of the prepared paneer stuffing and start rolling. Seal the ends with wet fingers and with seam side below, place on lined baking tray. Repeat until all filling is used


Brush few drops of oil on all of the rolls and bake at 170degC for about 15-20 minutes until golden


Tuesday, 18 December 2012

Peanutbutter chocolate fudge


Peanutbutter chocolate fudge
As I had mentioned before, we are not peanut butter people at all. However, I thought it is a good form for my son to try his hands on peanuts. I try not to give him whole nuts until the recommended age of about four so peanut butter is good enough now. I have not tried spreading it on bread but I do know he likes the chocolate spread and may not like this much. Anyway, I thought I will make something new without the need to really cook or bake and also allow him to participate. Here is a quick and easy treat...
6 tablespoon peanut butter
¼ cup icing sugar
150g chocolate
5 digestive biscuits, crushed finely
2 teaspoon oil

Mix the crushed biscuits, icing sugar and peanut butter together, add just enough oil so the mixture comes together

Spread this on a plate to desired thickness.

Melt chocolate in a double boiler (put chocolate in a bowl and place this on a pot of boiling water making sure the water does not touch the bowl), making sure no water gets into the chocolate itself. Melt completely. You could do this in a microwave oven if you want.

Spread over the peanut butter mixture and set in fridge

Cut using sharp knife, dipping the knife in hot water
Enjoy!

Friday, 7 December 2012

Chocolate Truffle


Chocolate Truffle
What a day it has been! Started off with a severe migraine and I thought one more day of my life goes a waste. But when you are so far away from home and help, regardless of how unwell you are, you just got to get on. So I did. Made a simple lunch and then slowly started feeling better. I had been feeling terrible about not making much progress on the book front as I only have 3-4 recipes firmed up so far and have miles to go. With the holiday season round the corner, I wanted to bring the right mood in my household too. I have heard about truffles but as I am not a huge fan of chocolate I don’t think I have tried them before. I wanted to whip some up, but as you can imagine, the traditional one is not something I can quite make as it comes with loads of guilt. I wanted a sinless dish and not a sinful one. I had some shredded wheat (breakfast cereal) left over as my son stopped eating them suddenly. I did not want to throw them away so put them to good use here. I rolled the truffles in good coco powder. However, the bitterness of the coco was quite strong. For that reason, I am suggesting it be mixed with icing sugar or even powdered sugar and then rolled. Alternately, you could use coco powder which has lesser coco. I had made them bite size so once you put them in your mouth, the bitterness hits but is soon followed by sweetness from dried fruits. This recipe makes about ten truffles. You could use any other dried fruit like prune or apricot too. . Dry fruits are a good way to get your recommended quantities of fruits and these goodies will appeal to the young ones too. I will be working on few more varieties of truffles, but until then, here is an easy peasy one..
1/3 cup dates
1/3 cup raisins
¼ cup ground almonds
2 tablespoon coco powder
1 tablespoon icing sugar
1 shredded wheat biscuit or about 2 digestive biscuit

In a food processor, pulse the dates and raisins. It should not become pureed but just lumpy

Add the ground almond and broken shredded wheat and pulse few more times so they all come together


Roll into bite size balls and roll this on a mixture of icing sugar and coco powder

Dive in!