Showing posts with label gluten free. Show all posts

Saturday, 2 August 2014

Chakli (Mullu Muruku)


Chakli
It is summer holiday for school now so for the first time, my son is at home. Crispy snacks can always come handy when you have a bored young child around. Rather than buying them, I thought I should give it a try myself. Afterall, it may not hurt too much to fry now and then. I picked something easy and this was it. Also, my son’s friend’s gran had made this and after trying them my son asked me to make some. What I loved about what I made is it tasted quite like ‘kai muruku’, the one shaped with hand without the labour of sitting down to shape them. Hope you like it as well. It is one of the 'batchanams' made for Krishna Jayanthi and even Diwali. Here is the recipe...

3 cups rice flour (I used store bought rice flour)
1 cup besan flour
Salt to taste
Dash of asafoetida
1 teaspoon chilly powder
3 tablespoon oil
1 teaspoon ghee
1 tablespoon white sesame seeds
Oil for deep frying

Sift the flours together and add chilly powder, asafoetida, sesame seeds and salt

Heat the three tablespoons of oil, ghee and add it to the flour mixture and mix to form crumb like consistency. Heated oil and ghee are used to amke sure the murukus come out crispy. Rather check the seasoning at this stage than later


Add water slowly to make a soft dough. The dough must be soft enough to be able to be forced through the mould. Rather add water little by little so it does not become to soft. Also, check the consistency by putting it into the mould and see if it comes out without problem. What you do not want is, hard dough struggling to come out and eventually forces the mould open and falls into hot oil splashing it all over you and the kitchen!

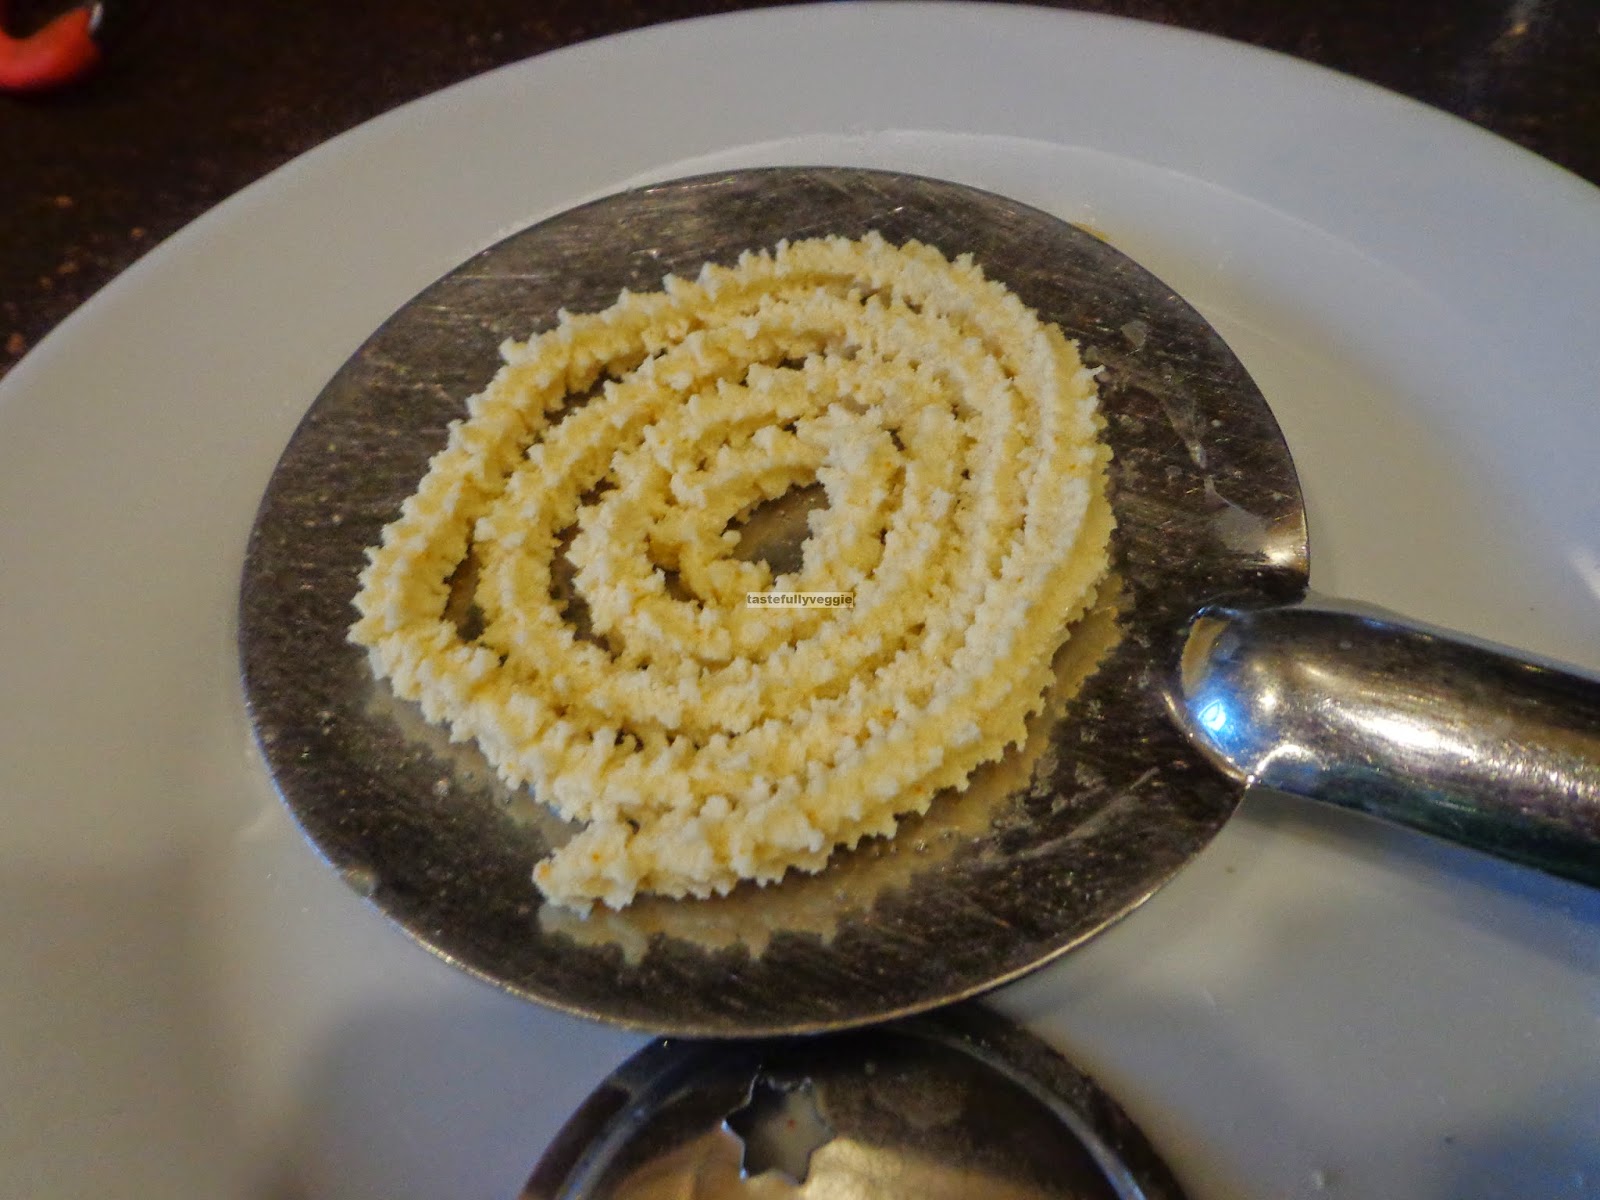
Use the star shaped mould and make murukus on a ladle as shown. This can be slipped into hot oil for frying. Check if oil is ready by putting a small piece of dough in. It is ready if it emerges up quickly. It does not have to be perfectly shaped, so you can even press it directly into the oil in random shape.


Fry both sides until golden, drain and keep aside


Cool completely before putting in airtight boxes.


Friday, 6 May 2011

Baingan Bhaji


Baingan Bhaji


I cannot write enough of my love for eggplants and neither can I get enough of them. Lately, I have been trying to make dishes that are not really a gravy but not too dry either. The advantage is that they can be wrapped in rotis and taken for packed lunch. This is one such dish where if you prefer, you can increase the quantity of tomato and make it a gravy or keep it semi dry. I made this using a Spanish eggplant but you could use any variety you manage to lay your hands on. I decided to give the dish some freshness and for this reason I roasted some coriander seeds and to give it some texture, I coarsely crushed it in the mortar and pestle. If you are using the Spanish eggplant you may be tempted to add a lot of oil but just hold back as adding salt soon after you add the eggplant can do the trick of releasing the juices from it an dletting it cook without burning. Although the list of ingredients seems long the process itself is short and quick. Here is my recipe...

1 eggplant thinly sliced into long pieces
1 onion finely chopped
1 tsp jeera, turmeric
1 teaspoon kasoori methi
Ginger and about 4 cloves garlic finely chopped
2 tomatoes finely chopped
½ tsp tamarind paste
2 tablespoon coriander seeds
4 dry red chillies
2green chillies, finely chopped
1 teaspoon cumin seeds
Coriander leaves, finely chopped to garnish
Turmeric powder
Salt to taste
Cooking oil

Roast coriander seeds and dry red chillies and powder coarsely

Heat some oil in a skillet and add cumin seeds, once it browns add onions, garlic, ginger, green chillies, little salt and cook until onion softens

Add eggplants and tomatoes, tamarind paste and required salt and turmeric powder add little water and let it cook. Cooking covered speeds up the process and also seems to enhance the consistency.

Add kasoori methi and ground coriander-chilly powder and cook for 3-5 minutes

Add coriander leaves, serve

If you want a gravy consistency, increase tomato quantity and also more water after adding kasoori methi and coriander-chilly powder

Wednesday, 4 May 2011

Kadai Aloo


Kadai Aloo
The best thing about the universally loved vegetable, potato, is that it is so versatile. You could make a starter or an entire meal out of it. I find it an easy option to cook a dish with potato when I have people over because they are unlikely to dislike potato. I was having a friend and her colleague over to our place and they were going to stay with us for the weekend. They were on a twelve hours bus journey to reach our place and I was pretty sure they would be starving by the time they reach home. Although usually I would make a lot of effort to cook elaborate meals if anyone comes home, this time I was going to be more relaxed as it was a close friend and also because I think I am gaining more confidence as a cook. These days it is easier and quicker to whip up a delicious meal and get credit for it. Anyway, I had made palak dal, chapatti and was going to make chatpate aloo. Then it changed to aloo in a rich gravy and finally it ended up becoming the recipe I have posted now. I must say that it was a hit and I thought my husband may not like it as it was not really a gravy but a moist sabji like consistency, I was proved wrong. This recipe is certainly a keeper! Here is how I made it


4-5 medium sized potatoes, cubed and boiled
1 onion, sliced thinly
3-4 dry red chillies (preferably soaked in water for some time)
2 tablespoon cashew nuts
1 teaspoon kasoori methi (dried fenugreek leaves)
3-4 cloves of garlic
1 inch piece ginger
1 teaspoon coriander powder
1 teaspoon cumin powder
½ teaspoon cumin seeds
Handful of coriander leaves, finely chopped
Salt to taste
Cooking oil

Grind together red chillies, cashewnuts, ginger, garlic, coriander powder and cumin powder. Add water just enough to grind it to a paste


Heat some oil in a skillet and add cumin seeds. Once it browns add onions and cook until it softens

Add the potatoes and mix so the oil coats the potatoes and it does not become mushy. Add the ground paste, required salt, kasoori methi and coriander leaves and cook on low flame until raw smell goes. You may cook longer to enable the flavours to soak into the potatoes

Serve hot with rice or any Indian bread or even Pita bread!

If you like the yellow colour, add turmeric powder once onion softens.

Sunday, 24 April 2011

Curried Spring Greens and Saag


Curried Spring Greens and Saag

Despite spring greens being a healthy leafy green vegetable, it is not quite popular in my kitchen. I have found the lack of tenderness of the leaves to be the reason why it is not ideal for me. However as I am trying to cut costs as far as possible and one of the challenges it poses is utilisation of cheaply available nutrients, I thought I should try the spring greens again. This time I was clever in having a nice dish to inspire me and it was sarson ka saag (a dish made with mustard leaves and spinach). I came across the recipe on show me the curry and that gave me some tips like removing the rib of the leaves so the hard fibre in them do not put me off. In order to impart more flavour and make it closer to sarson ka saag I added mustard seed paste and also cooked the dish in mustard oil. I have not tasted sarson ka saag before but I can tell you that this dish came out very well. This has made spring greens a keeper in my shopping list. Here is how I made it...

2 bunches spring green, the centre rib removed and leaves torn up
2 handfuls of fresh spinach
1 cup tomato puree or 3 finely chopped tomatoes
1 onion, finely chopped
2 teaspoon mustard seed paste
1 teaspoon ginger garlic paste
1 teaspoon chilli powder
1 teaspoon dhania powder
Few pinches of Punjabi garam masala or normal garam masala
2-3 green chillies finely chopped (adjust according to preference)
Salt to taste
Turmeric powder
Cooking oil

Bring together the spring greens and spinach in a saucepan and cook in about half cup water


Cool this and pulse it in food processor. If you prefer puree, then grind accordingly

Heat some oil and add the onions, fry for a couple of minutes and add ginger garlic paste and chillies and cook until onion turns soft

Add the tomato puree (use thick puree) and turmeric powder and cook until they all come together

Add the spring greens and spinach mixture, chilli powder, coriander powder, garam masala, mustard seed paste and salt. Add about half cup water and cook for about 5 minutes or until desired consistency is achieved.

To garnish, you could sauté chunky chopped onions and tomatoes, this is optional though.

Serve with any Indian bread or rice

Friday, 25 March 2011

Ginger Chutney (Andhra Style)


Ginger Chutney (Andhra Style)


When you have some great chutneys, it is hard to determine whether idli or dosa is the nain dish or the chutney. Well, usually we need chutneys for idli or dosa and usually upma and pongal as well. I like variety in chutneys and not just the usual coconut chutney. I saw a ginger chutney recipe on a television program and adapted it to our taste. One of the ingredients I forgot to add was dry red chillies but the chutney still came out great. Am sure the chillies will make it even better. I have almost stopped buying coconut and grating it freshly even for chutneys. I could not break and grate them myself so often they were just rotting in the shelf. I stopped buying them and now I use dessicated coconut for all coconut based dishes and I must say I do not really miss fresh grated one. I may not do the same for few dishes like kozhukattai etc. as the fresh juices from the coconut adds a special flavour. Anyway here is my chutney recipe...

3 tablespoons grated or dessicated coconut
1 tomato, chopped
½ - 1 teaspoon tamarind paste
2-3 tablespoons ginger,chopped
2-3 dry red chillies
Salt to taste
Asafoetida
Cooking oil

Heat a kadai and little oil and fry the dry red chillies, coconut, tomato and asafoetida and cook until the tomato wilts and add ginger and tamarind paste at this stage

Cool and grind with required salt and serve

You could use some mustard seeds for tempering

Wednesday, 23 March 2011

Kathrikai Kara Kozhambu (Eggplant in Tangy Spicy Sauce)


Kathrikai Kara Kozhambu (Eggplant in Tangy Spicy Sauce)


Whenever mom could not cook at home (not very often as she made every effort to make us good food), we would order meal from Saravana Bhavan. One of the items I used to love from them was kara kozhambu. I remember my mom making it for me just like how they made it. It has been many years since I last had it and recently my sister-in-law reminded me of the dish. I realised I still had loads of the Indian eggplants to finish off so I just took the opportunity. It is a very quick recipe and can be whipped in very little time. As I loaded it with eggplant, which is one of the five a day vegetables, it just means you get a healthy and wonderful comfort food. Well, kara kozhambu to me is a comfort food. ‘Kara’ means hot and ‘kozhambu’ refers to sauce but you can make it as hot or as mild as you like. Serve it with plain rice, chapattis or curd rice. Yum yum!

1 onion, coarsely chopped
1 tomato, roughly chopped
2 tablespoon grated coconut or dessicated coconut
1 cup of chopped eggplant
1 teaspoon tamarind paste
1 teaspoon mustard seeds
Asafoetida
½ teaspoon sambar powder (optional)
½ teaspoon chilly powder
Turmeric powder
Salt to taste
Cooking oil

Grind the coconut, tomato and onion to a fine paste. You could add some garlic pods to this if you like. (forgot to click, sorry!)

Heat some oil and add mustard seeds. Once it crackles add asafoetida, turmeric powder and the cut eggplants and sauté for couple of minutes

Add tamarind paste and enough water to cover the eggplants and cook covered.

Once the eggplants are cooked add the ground paste, chilly powder and/or sambar powder, salt and cook till raw smell goes. Add water if needed and cook until desired consistency

Serve with rice or rotis!

Friday, 18 March 2011

Baghara Baingan


Baghara Baingan
I saw a program on the tele in which they made Hydrabadi baghara baingan. At that time I was did not think I will have access to any brinjal other than the Spanish one and did not quite bother to note the recipe. However I did get a chance to buy the long and sort of thin brinjals and first thing I wanted to try was this dish. I looked for a few recipes hoping it will ring a bell as to how the lady on the television program did it but not quite lucky. I then saw Tarla Dalal’s recipe and tried it. The outcome was very nice. I must say that the appearance of the dish is probably not universally appealing and even my husband kept asking me if it was fish. It was hard to get a good picture with the eggplant clearly visible in the finished dish so I took the shots when I ate them with dosa. They were great with dosa, chapattis and curd rice. Here is the recipe...

4-5 eggplants, slit length wise but still held together by the sepal part of the veggie
1 teaspoon mustard seeds
¼ teaspoon fenugreek seeds
2 green chillies slit
Curry leaves, 1 sprig
For spice paste:
2 tbsp sesame seeds
2 tbsp grated coconut or dessicated coconut
2 tbsp raw peanuts
1 tsp chopped ginger
1 tsp garlic, chopped
1/4 cup chopped onions
1/4 tsp turmeric powder
1 tsp coriander (dhania) powder
1 tsp cumin seeds (jeera) powder
1 tsp chilli powder
1 tsp tamarind pulp

Roast all ingredients except the coriander powder, cumin powder, turmeric powder and tamarind pulp mentioned for spice paste, cool and grind to paste adding the remaining ingredients for the paste

Heat a couple of teaspoons oil and add the mustard seeds and fenugreek seeds. Once mustard crackles, add the brinjals and sauté for a couple of minutes, by this time it will begin to change colour, keep aside

In the same pan add the ground paste and little oil and cook until mixture leaves sides of the pan

Add the brinjals, required salt, little water and curry leaves and cook covered until it is done

Garnish with coriander leaves if you like and serve!

Wednesday, 2 March 2011

Kadalai Paruppu Payasam (Channa Dal Kheer/Dessert)


Kadalai Paruppu Payasam (Channa Dal Kheer/Dessert)


It is usually only on Fridays that I make dessert and as far as possible I try to use ingredients that can supplement any lacuna in the rest of the meal. This could be a vegetable, fruit, pulse or a grain. For this dessert, it was a dal that I picked. The dish itself is a very traditional dessert and my mother-in-law makes it for most festivals although it is not common in my mom’s household. This time though I barely had any time to make it the traditional way and just took a modern short cut. Well, it certainly is not an unhealthy shortcut but just clever use of ingredients. I will describe at the end of the recipe how it is traditionally done. As I always try to make quick and healthy dishes so I get more time with my wee one outside the kitchen, I think I will stick to my way of doing…

1/3 cup kadalai paruppu (channa dal), pressure cooked
2-3 cups milk
2 tablespoons brown sugar
1-2 tablespoons dessicated coconut
2 cardamom
Few raisins fried in ghee

Grind most of the cooked dal to fine paste and add the remaining dal at the end and pulse. This gives a nice texture to the dessert.

Boil it with milk and once it just begins to boil, add cardamom, dessicated coconut and sugar.

Boil until desired consistency is achieved, add more milk if needed. Put few drops of ghee on top to help it not solidify too much when it cools.

Add the raisins and serve. Tastes great warm or cold


Traditionally, it is done pretty much with coconut milk and not much of cow’s milk is used. Also, instead of brown sugar, jaggery is used but you may have to dissolve the jaggery, fliter it to remove the grit and use the jaggery syrup. Some tend to cook the dal in coconut milk and some people cook it in cow’s milk and add coconut milk when boiling the ground dal. As I do not usually make fresh coconut milk and also tend to use it in moderation, I cooked the dal in water and then added cow’s milk. The dessicated coconut gives a nice subtle flavour but traditionally they use freshly grated coconut. Ofcourse you can add some fried cashews to garnish. As you can see, I tried to just combine ingredients off the shelf, thereby reducing cooking time but not the taste!

Saturday, 19 February 2011

Brown Rice Vegetable Masala Dosa


Brown Rice Vegetable Masala Dosa


Right from my childhood I was brought up eating raw rice and same was the case for my husband. I would not even take even par-boiled rice except ofcourse when added to idli or dosa. You can then imagine how hard it must have been for us to try brown rice. Until now, I have not had the courage to replace white rice with brown rice in a dish like pulav or anything. However, as I am a very nutrition and health conscious cook, I knew I had to find them a place in our diet. The fibre in brown rice is said to help prevent colon cancer and gallstones. Brown rice has a lower glycemic index meaning it will release its caloric content slower and hence keeps one fuller for longer and also helps maintain stable sugar levels. For the world of benefits it offers I thought it to be appropriate to combine it with few other goodies. As everyone knows a meal is not balanced without vegetables. So this time rather than making masala dosa with usual potato stuffing I decided to add more veggies and left few potatoes chunky to make it look like regular masala. I also made coconut chutney as I did not have time for any other chutney that evening. Here is the recipe for dosa and vegetable masala.

For the dosa:
½ cup brown rice
½ cup par-boiled rice (idli rice)
¼ cup black lentil (urd dal)
¼ poha (beaten rice)
1 teaspoon fenugreek seeds
Salt to taste

Soak all ingredients together overnight. Grind it together to a fine batter adding required water and then add water. The consistency should be similar to idli batter so you can add more water later.

Allow the batter to ferment overnight. I let it out for two nights as it was cold here and it needed a bit more time

To make the dosa, spread a ladle full of batter on a hot pan and add little oil around the dosa. Flip the side once the top sets and edge appear brown and cook for a minute or less

For vegetable masala:
2 small potatoes, boiled, cubed
1 cup boiled vegetables (I used frozen mixed veggies, carrot, peas, beans, corn)
1 tomato, chopped
1 onion finely chopped
2 green chillies, slit
1 inch ginger, grated
Some curry leaves
Turmeric powder
1 teapsoon mustard seeds
Asafoetida
Salt to taste
Cooking oil

Heat a little oil and add mustard seeds. Once it crackles, add onions, ginger, green chillies, turmeric powder, curry leaves and asafoetida

Once onion turns soft, add the tomato and a pinch of salt.

Once tomato becomes mushy add the vegetables and potato and mash it coarsely. I did not want them too mashed, especially the potatoes.

Add required salt and cook for a couple of minutes.

Once both sides of the dosa are cooked, please about a tablespoon of the vegetable masala on one side of the dosa and fold over. Serve with a nice chutney!


The dosas came out evem better than restaraunt dosas and I was delighted. It was indeed very filling. You can make around 10 dosas with the said quantity.

My wee one had a special dosa, cat again!

I am sending this to wholesome wholegrains event hosted by http://www.cookingwithsiri.com/2011/01/wwc-brown-rice-for-dinner-event.html. Here is the main event and this month Siri is hosting the event for wholegrain rice dinner recipes.