Showing posts with label quick snack. Show all posts

Tuesday, 22 April 2014

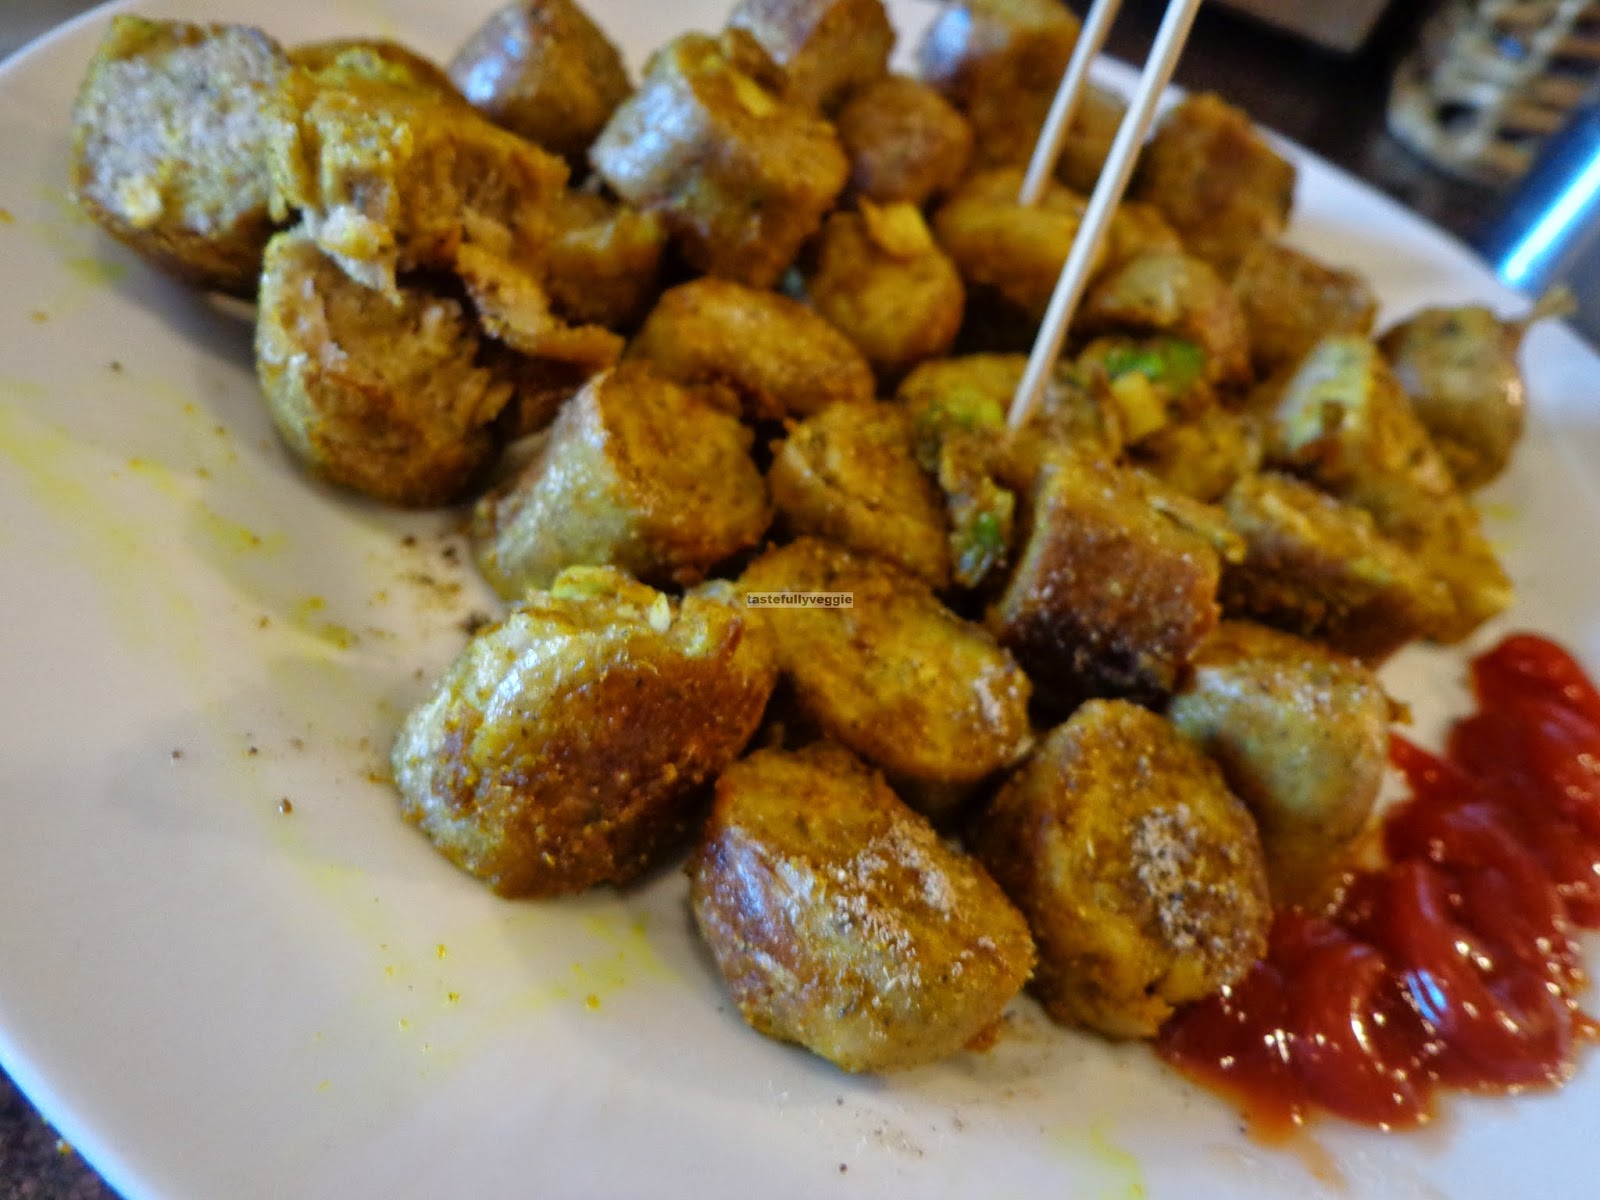
Vegetarian sausage stir fry (Masala Quorn Sausage)


Vegetarian sausage stir fry (Masala Quorn Sausage)
I grew p as a vegetarian and have never tasted non vegetarian food so there is nothing I miss really. However, I guess it is not the case in this part of the world and there is a desire to replicate the non-vegetarian content and make meat substitutes. A variety of such ingredients is made by Quorn. They apparently use a form of fungi to make the meat substitutes. I found no reason to use them in my regular cooking but my kids are used to having them a school or day care as they try to make vegetarian and non veg dishes look similar. My son started asking me for sausages (vegetarian, ofcourse) at home and that is why I buy them now and then. This dish is incredibly simple to make and can be had as a quick snack. You can also use this to stuff inside wraps. The sausage itself, being processed food, has salt in it so I tend not to add any more. I usually add very little salt in my cooking anyway so if you need a bit more, feel free to add.

1 pack quorn sausage
½ teaspoon ginger garlic paste
Turmeric powder
½ teaspoon coriander powder
½ teaspoon cumin powder
Dash of chat masala
1 spring onion, chopped
Cooking oil

Heat some oil preferably in a non stick pan and cook the sausages as per pack instructions. Once done, let it cool and then slice into bite size pieces


Heat bit of oil and add the spring onions, ginger garlic paste, turmeric powder and sauté for couple of minutes until raw smell goes off.


Add the sliced sausages, the masala powder and sauté for couple of minutes and it is ready to serve.


Sunday, 20 October 2013

Chocolate and Cherry Palmiers


Chocolate and Cherry Palmiers
Palmiers or elephant ears, is a dish of European origin, not sure if it is French or Germans that originated it. Does no really matter as it just tastes so good you would not want to research the origin but just the recipe. These are so easy to make if you have puff pastry in your fridge. I do not make my own puff pastry and hey, don’t judge me for that, even the best of bakers like Mary Berry and Paul Hollywood once confessed they don’t either. I actually made them for the first time to offer to my son’s friends who were meant to visit us for navaratri. However, I had to cancel their visit due to my daughter’s illness. Anyway, the point is that even if they had come, I did not make near enough of these as it turns out. They literally go flying and I kept making them throughout navaratri as we had a constant flow of guests. This is one version of this dish and I intend to post more of these so you get a variety of flavours.

½ sheet of puff pastry
2 tablespoon or so of chocolate spread like nutella
5-6 glace cherries, chopped

Spread the puff pastry sheet and smear it with the chocolate spread evenly, upto the edges. Dot with glace cherries here and there and use more if you want.


Roll both sides of the pastry so each half then meets at the centre, gently press. Wrap it and refrigerate for atleast 30 minutes or put in freezer for 10-15 minutes. This is important as puff pastry always needs to be cold and has to go in a very hot oven, else, it will not puff.


Cut into about 1.5cm thick slices and place on lined baking tray with good space between them. Bake in a pre-heated oven at 200degC for about 8-10 minutes, until golden.


Cool and serve!


Tuesday, 18 December 2012

Peanutbutter chocolate fudge


Peanutbutter chocolate fudge
As I had mentioned before, we are not peanut butter people at all. However, I thought it is a good form for my son to try his hands on peanuts. I try not to give him whole nuts until the recommended age of about four so peanut butter is good enough now. I have not tried spreading it on bread but I do know he likes the chocolate spread and may not like this much. Anyway, I thought I will make something new without the need to really cook or bake and also allow him to participate. Here is a quick and easy treat...
6 tablespoon peanut butter
¼ cup icing sugar
150g chocolate
5 digestive biscuits, crushed finely
2 teaspoon oil

Mix the crushed biscuits, icing sugar and peanut butter together, add just enough oil so the mixture comes together

Spread this on a plate to desired thickness.

Melt chocolate in a double boiler (put chocolate in a bowl and place this on a pot of boiling water making sure the water does not touch the bowl), making sure no water gets into the chocolate itself. Melt completely. You could do this in a microwave oven if you want.

Spread over the peanut butter mixture and set in fridge

Cut using sharp knife, dipping the knife in hot water
Enjoy!

Friday, 7 December 2012

Chocolate Truffle


Chocolate Truffle
What a day it has been! Started off with a severe migraine and I thought one more day of my life goes a waste. But when you are so far away from home and help, regardless of how unwell you are, you just got to get on. So I did. Made a simple lunch and then slowly started feeling better. I had been feeling terrible about not making much progress on the book front as I only have 3-4 recipes firmed up so far and have miles to go. With the holiday season round the corner, I wanted to bring the right mood in my household too. I have heard about truffles but as I am not a huge fan of chocolate I don’t think I have tried them before. I wanted to whip some up, but as you can imagine, the traditional one is not something I can quite make as it comes with loads of guilt. I wanted a sinless dish and not a sinful one. I had some shredded wheat (breakfast cereal) left over as my son stopped eating them suddenly. I did not want to throw them away so put them to good use here. I rolled the truffles in good coco powder. However, the bitterness of the coco was quite strong. For that reason, I am suggesting it be mixed with icing sugar or even powdered sugar and then rolled. Alternately, you could use coco powder which has lesser coco. I had made them bite size so once you put them in your mouth, the bitterness hits but is soon followed by sweetness from dried fruits. This recipe makes about ten truffles. You could use any other dried fruit like prune or apricot too. . Dry fruits are a good way to get your recommended quantities of fruits and these goodies will appeal to the young ones too. I will be working on few more varieties of truffles, but until then, here is an easy peasy one..
1/3 cup dates
1/3 cup raisins
¼ cup ground almonds
2 tablespoon coco powder
1 tablespoon icing sugar
1 shredded wheat biscuit or about 2 digestive biscuit

In a food processor, pulse the dates and raisins. It should not become pureed but just lumpy

Add the ground almond and broken shredded wheat and pulse few more times so they all come together


Roll into bite size balls and roll this on a mixture of icing sugar and coco powder

Dive in!


Wednesday, 5 December 2012

Multigrain Mango Muffin


Multigrain Mango Muffin
MMM recipe! Sounds tacky isn’t it? Well, I thought it is a good acronym for this really multigrain mango muffin. I had some left over mango pruee following my eggless mango cake trial and wanted to make a good breakfast. I thought cardamom would go well with mango as it is not a very strong flavour and will not fight with mango. I tried to take as many clicks as possible as I made the muffins but towards the end, after resting them, I thought they may not be good enough. I was so wrong and my fear of the effect of the ingredients I used was unjustified. I thought it will be an extremely dry muffin and will have a poor texture. However, it was quite good. It was quite springy, soft and easy to eat. Usually, millets tend to make the baked product a bit dry and difficult to swallow but I think it is the fruit puree that helped this muffin. If you find you child binging on this, just as well, the goodness in it will help their growth. Here is the recipe, lets get the holiday season started. Like most of my recipes, this is not very sweet so if you have a sweet tooth, please increase the sugar but have in mind that the mango pulp is sweet as well.
¼ cup ragi flour
¼ cup oat flour (oats ground)
1 teaspoon cardamom powder
¾ cup all purpose flour
½ cup water
1/3 cup brown sugar
1/3 cup mango puree
Pinch of salt
2 tablespoon oil
2 teaspoon baking powder

Mix together the flours, baking powder, sugar, cardamom powder and salt

Add the oil, mango puree and water and mix until just combined

Pour into muffin moulds, about 3/4th full and bake in a preheated oven at 180degC for 20-25 minutes. A skewer inserted in centre should come out clean.


You may dust with some icing sugar and serve.


Sunday, 25 November 2012

Poppy Seeds Salt Cookies


Poppy Seeds Salt Cookies
If you follow my blog on facebook, you have probably read about my plan to write a book on eggless baking. Well the idea is to have atleast 20 recipes including cakes, muffins and biscuits. In my mind this book should help anyone, be it beginners or pro, start to believe in eggless baking and that it does not mean the end result is not enjoyable and delish. To draw more inspiration, I am trying a few recipes to understand them better and this is from one of the books I have. I struggled to keep myself away from the end result. I do not bake savory often because it is normally just me that likes it and can’t be bothered to please myself. This however, went down well with my son as well and I was selfish enough to keep them away from my husband (he was not even told I had made this and in my defense, he probably does not like savory bake)! I had so underestimated the flavour of these teeny tiny seeds! Here is the recipe...
1 cup flour
1 tablespoon poppy seeds
1 tablespoon butter
6-7 tablespoon single cream
1 teaspoon sugar
2 pinches salt
Bit more salt (don't avoid this else you are missing the kick)

Sift the flour and salt

Mix together the sugar and poppy seeds with the flour

Rub the butter so the mixture resembles bread crumbs

Add just enough cream to make a stiff dough

Roll to a disc of about 4-5 mm thick and cut into about 20 pieces (I was in a rush so could nto be bothered with regular shapes) and place on a lined baking tray. Sprinkle some salt on top


Bake in a preheated oven at 150degC for about 25-30 minutes until crisp, still pale.

Cool completely and store in air tight container


Saturday, 17 November 2012

Jowar Methi Muthiya (Sorghum dumplings)


Jowar Muthiya (Sorghum Dumplings)
Some days I follow a restricted diet and it was one such day that I was terribly hungry. I was wondering what to make for breakfast and was looking for nothing elaborate as time in the kitchen was precious and spending it on just breakfast for me seemed unfair. I then thought of making muthiyas with jowar as I remembered seeing a similar recipe by Tarla Dalal. I had fresh methi leaves on hand and for me, that is just about enough to make any dish very appealing. I was not sure what to expect out of jowar muthiyas so methi would be enough to atleast help me gobble the dish. Luckily, my scepticism was unjustified as the muthiyas were really good. They were full of goodness and yum! My son also quite liked it and was happy to nibble while he played, making it a good finger food. I thought presenting it like lolly pops was a good idea but could not get a good picture of it.

Jowar is called sorghum in English. It is a millet and as expected, has several health benefits. It is rich in phosphorous and potassium. A cup of sorghum is said to provide about 40% of the protein recommended per day. It is fiber rich and also has some anti-oxidants making it offer some protection against cancer. It is, obviously, wheat free so great for people with allergy or caeliacs.

1 cup jowar flour
Handful of fenugreek leaves
Salt to taste
1 teaspoon coriander powder
½ teaspoon chilly powder
Dash of turmeric powder
1 teaspoon mustard seeds
1 teaspoon sesame seeds
Cooking oil

Mix together the flour, chilly powder, coriander powder, turmeric powder, fenugreek leaves and salt. Add just enough water to make a dough


Divide into three parts and using your fist (that is why it is called muthiya), make cylinders of the dough and steam them for about 20 minutes

Cool and cut into about half an inch long slices

Heat some oil and add mustard seeds and sesame seeds

Once the mustards pop and sesame begins to brown add the cut muthiyas and roast until desired. Roast on low flame for a while if you like it slightly crispy without adding much oil

Insert tooth picks and watch them dissappear!


Sunday, 14 October 2012

Ammini Kozhukattai


Ammini Kozhukattai
This recipe has been in my draft for a month or so. With this post, I think I would have covered important recipes for Vinayaga Chathurthi. This dish, I would say is a cousin of ‘pidi kozhukattai’. Very simple to make but it tastes really good. It could make a great after school snack and left over can be had for breakfast. I was running out of regular rice flour so mixed red rice flour as well, so next time I may make it using red rice flour or brown rice flour only just to make it that bit healthy. You could try a few other tweaks to the recipe too. For instance, use some sesame seeds in the tempering, or top it with coarsely crushed roasted groundnut. So here is my basic recipe...
1 cup rice flour
1 teaspoon mustard seeds
1 tablespoon grated coconut/dessicated coconut
1 teaspoon sambar powder/idli milagai powder (gun powder)
Gingelly oil, preferrably
Salt to taste
Curry leaves
1 green chilly, coarsely chopped

In a saucepan, combine the rice flour, boiling hot water and salt to make a soft dough. Add some oil to make the dough less sticky

Make bite size balls with the dough and steam for 15 minutes

Heat oil in a kadai and add mustard seeds. Once it crackes, add green chillies and coconut.You can turn the flame off while adding coconut

Add the kozhukattais and add gun powder and mix but ensure you do not break the kozhukattais

Serve!