Friday 30 March 2012

Vegetable Kolhapuri


Vegetable Kolhapuri

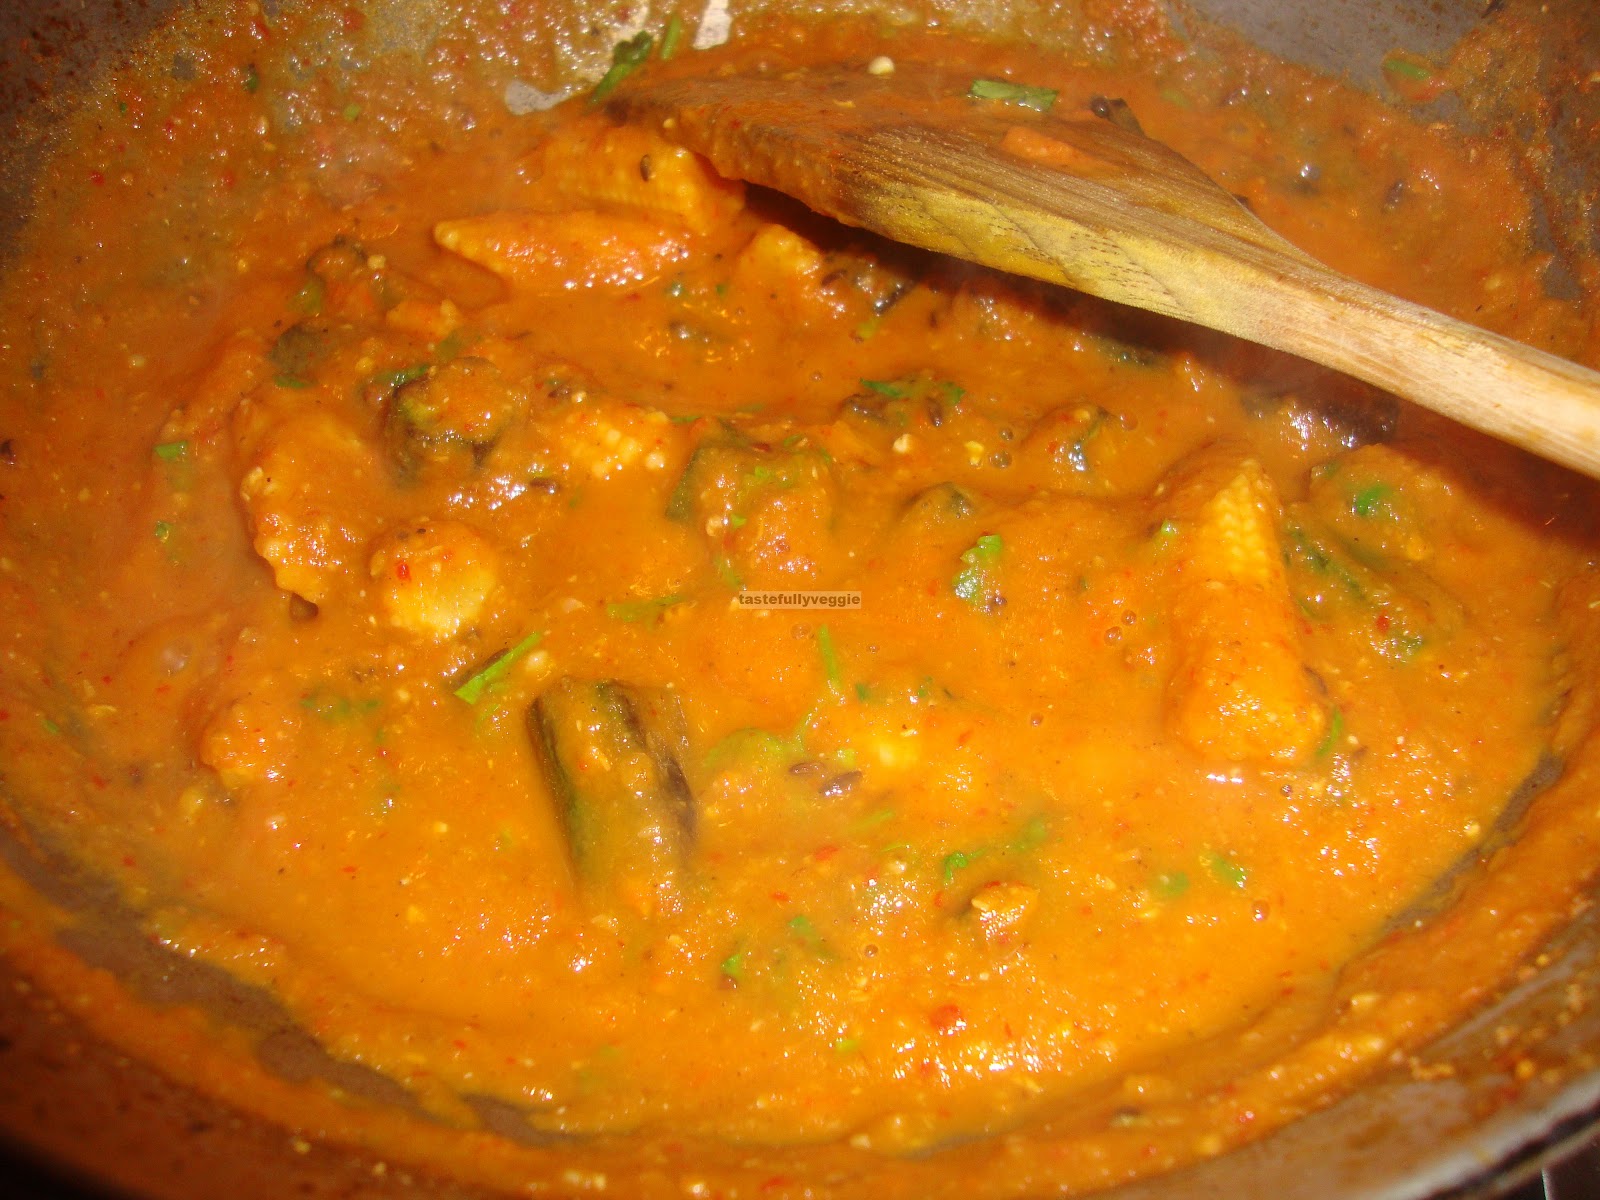
I like to eat a variety of gravies with rotis or even rice and prefer not to make just the usual stuff. I do manage to look at Tarla Dalal’s website every now and then and keep bookmarking recipes. Sometimes I wish to try some of them in the next available opportunity and this recipe was one such. My husband prefers gravies to semi dry or dry sabjis so I made it a bit more watery than she had suggested. I also reduced the coconut quantity a wee bit just to keep the overall fat on check. It is suppose to be a Maharashtrian dish and is mentioned as quite authentic. We had this with rotis and it did taste very good. I did not have kashmiri red chillies but used regular dry red chillies so it was not bright red. The sweetness from the coconut imparts a beautiful flavour to the gravy. I had some paneer frozen and waiting to be used and added it as well, needless to say, it was great. You could skip the paneer and add other vegetables if you like. Here is the recipe…

2 cups boiled vegetables (I used peas, carrot, cauliflower)
1 onion, finely chopped
2 tomatoes, finely chopped
1 teaspoon garam masala
Some chopped coriander leaves
Cooking oil
Turmeric powder
Salt to taste

To grind to paste (grind dry first then slowly add water as required else poppy seeds will not grind):
2 cloves garlic
Small piece of ginger
4 dry red chillies
4 teaspoon dessicated coconut
1 tablespoon sesame seeds
1 tablespoon poppy seeds
Little water

Heat some oil and add the onions, fry until it just begins to brown

Add tomatoes, turmeric powder and the ground paste, cook until raw smell goes away, add little water as and when needed to avoid burning

Add the boiled vegetables, a glass of water and simmer, add coriander leaves, garam masala, salt and simmer until desired consistency achieved. It does thicken once cooled so you may want to add more water

Serve!

Monday 26 March 2012

Shahi Dal


Shahi Dal


Here is another recipe that started off with one intent and ended up being something else. Well, I had bookmarked shahi dal from Tarla Dalal’s website. I did not quite get whether I was meant to use whole urd with skin or broken with skin. I chose the former as I had a small pack to be used up and every little helps empty my pantry. I had soaked about half a cup of the dal for almost 24 hours as I did not get around to the kitchen that day and ended up eating at a friend’s place. The next day I had to use these up but did not get to look at the recipe just before starting as my husband was already starving after a shopping trip we made. I vaguely remembered the ingredients and method and just put it together as I thought was appropriate. Result – a really yummy dal with subtle yet rich flavours and packed with nutrition. I quickly made rotis to eat with this dal and we polished the dish clean! I was a bit unsure if my husband would like it but he loved it. This certainly is a keeper. Here is how I made it…

½ cup black gram with skin, rinsed and soaked overnight
1 small piece ginger, crushed/chopped
½ teaspoon chilly powder
¼ teaspoon garam masala (about ½ teaspoon if using store bought)
2 pinches kasoori methi (dried fenugreek leaves)
3 tomatoes, finely chopped
1 onion, finely chopped
¼ cup ground almonds/blanched almond flakes
4 cardamom pods
1 teaspoon cumin seeds
Turmeric powder
1 cup milk
Salt to taste
1 teaspoon butter
Cooking oil

Cook the dal with milk and ginger and add little water to it if needed. Pressure cooking would be ideal so it can be mashed once done (forgot a picture for this!)

Heat the butter along with some oil and add cumin seeds. Once it browns, add the onions and fry until golden

Add the tomatoes, little salt and cook until mushy

If using blanched almonds flakes, grind together the almonds and cardamom. If using ground almond, crush the cardamom alone. If soaking almonds and using, then grind to paste with cardamom. Add the almond and cardamom mixture

 Add the cooked and mashed dal, required salt, chilly powder, kasoori methi and garam masala and little water (could add any liquid left over from cooking the dal too)and bring to boil and simmer for about 10 minutes, stirring often.


Serve hot!

Wednesday 21 March 2012

Victorian Sponge Cake


Victorian Sponge Cake


Baking has been so much fun and I have been enjoying learning the nuances of baking. Like most skills, it just gets better with practise. One of our friends in Scotland wanted to learn some baking from me, not that I am an expert. However, I thought I could certainly help a beginner baker else I should not be blogging about it right. He wanted to try the simple Victorian sponge and preferred to do it with the egg. I am so spoilt with low calorie and healthy baking that in some ways I thought I am incapable of making with egg, butter and all purpose flour in it. Somehow I could not accept that despite being a food blogger, I can only do certain types of baking and not others. So it I took the opportunity to try my hands on a recipe that is not meant for anyone who is calorie conscious. Although the eggs get beaten, I chose not to use the mixer as I thought my friend will very well manage beating with hands and what better than being hands on while learning to bake. He sure did a good job as the sponge certainly was spongy! It was a very neat bake and the sponge was appreciated by everyone who got to taste it. I started checking if the cake was done after about 25 minutes. Usually it is said that you can start checking after about 20 minutes, but if oven is opened before that the cake may just sink and not rise due to the cold draft of air. Sticking in a skewer in the middle of the cake to check if it comes out clean would indicate if cake is done. You may want to rest the cake in the oven, turned off, for few minutes to complete the last bit of cooking. Usually sponge cakes are made in two identical sandwich tins. I had only one tin so chose to bake in my cake tin and cut it into half to put the jam filling.

150g butter
150g self rising flour
150g sugar
3 eggs
1 teaspoon vanilla essence
½ teaspoon baking powder
2 tablespoon milk

Preheat oven to 180degC

Line a cake tin with baking paper on bottom and grease with oil or butter on sides and the paper

Cream the sugar and butter together until soft

Add one egg at a time and beat until incorporated. Using wooden spoon is enough. Repeat with all eggs and beat the mixture until it is nice and soft. Add the essence towards the end


Sift the flour and baking powder and fold into the butter-sugar egg mixture. Do not overmix. If the batter is not to spooning consistency add little milk but again do not overmix

Pour batter into prepared tin. Drop the tin from about 4 inches height about ten times to get rid of any excess air bubbles

Bake for 35-40 minutes (until a skewer inserted in the centre comes out clean). You may need to rest the cake for five minutes with oven off and oven door closed

Rest the cake for further five minutes outside the oven before removing from cake tin. Transfer to wire rack and cool completely before cutting it into half

You could decorate this cake straight or just cut it into to and put a filling of jam or chocolate or whipped cream and serve with fruits.

Friday 16 March 2012

Amla Pachadi (Nellikai/gooseberry Pachadi)


Amla Pachadi (Nellikai/gooseberry Pachadi)


At one point this winter I was looking for multiple sources of vitamin C and amla (gooseberry/nellikai) is rich in it. I knew my grandmother would make a pachadi (raita) with it so got the recipe from her and tried it. Needless to say, it came out well. I kept it for couple of days and had with few variety rice. Amla is supposed to fortify the liver, balance stomach acids, nourishes the brain, helps urinary system, good for skin and hair, cools the body among many other benefits. Amla is usually available in fresh and dry form and both are said to be nutritive. Amla is also said to be able to stimulate isolated group of cells that secrete hormone insulin thus reducing blood sugar in diabetics. Here is the recipe…

5-6 gooseberries
1 teaspoon channa dal
½ teaspoon urd dal
½ teaspoon fenugreek seeds
2 dry red chillies
Asafoetida
1 green chilly
1 teaspoon mustard seeds
1-2 cup yogurt
Few curry leaves
Turmeric powder
Salt to taste
Cooking oil

Boil the gooseberries in water until done. Remove the seeds and mash them

Heat little oil and roast the channa dal, fenugreek seeds, dry red chillies, urd dal one after another, keep aside to cool and grind to powder

Heat little oil and add the mustard seeds, once it splutters, add turmeric powder, asafoetida, green chilly, curry leaves and add the ground powder and fry briefly

Add this to the mashed gooseberries, add yogurt, required salt and mix well

Serve

Thursday 15 March 2012

Very Berry Cake


Very Berry Cake


With my deadline to use up my freezer stock closing in, I had to figure out how I was going to finish up couple of bags of mixed berries that I had. First I wanted to bake berry muffin and make smoothies (I was pleasantly surprised to note how much fruits can be packed in just one glass of smoothie). Then I changed my mind to bake a cake instead of muffin. As usual, I wanted to minimise added sugar and rather rely on the fruits to lend sweetness and nice flavours. This cake is not too sweet and I think it could make a good breakfast especially for those in a rush or a tea time snack. Some people do not like cakes being very fruity, so feel free to adjust quantity of fruits. Now for my healthy very berry cake recipe...

1 cup all purpose flour
½ cup whole wheat flour
1 ½ teaspoon baking powder
½ teaspoon baking soda
1 ripe banana mashed
¾ cup light brown sugar (you could use white sugar too)
¾ cup yogurt (I used low fat as that is what is available in store)
½ cup sunflower oil
1 cup mixed berries
2 tablespoon mixed berries
2 teaspoon brown sugar

Line a cake tin with baking paper on bottom and grease it. Sprinkle the two teaspoons of sugar and also the two tablespoons of mixed berries

Cream together the yogurt, oil and sugar until all the sugar dissolves


Add the banana and mix until incorporated

Add baking soda and baking powder to this mixture and mix

Sift the flours together

Add the flours to the sugar mixture slowly and fold just until incorporated. Do not overmix

Add the mixed berries and give a final stir. I used frozen berries and did not thaw it.

Pour batter into prepared tin and bake at 180degC for 30 minutes and rest it in the oven for five minutes with oven off

Rest the cake in its tin for about five minutes after taking out of oven and transfer to cooling rack

Cool completely and cut


Tuesday 6 March 2012

Bhindi Babycorn Curry


Bhindi Babycorn Curry


I like babycorn and I like bhindi (okra/ladiesfinger) even more and what happens when both of them come together – a yummy dish that goes well with rice or chapatti. I had one pack of okra that needed to be finished and I knew it would not be enough so was looking into my freezer to find a friend for the okra. I thought the texture of babycorn would complement that of the okra and it did. My husband prefers gravy to dry sabji so that’s why I put together this dish. It is a fairly simple dish and very tasty. Here is the recipe…

10-12 bhindi, cut into inch long piece
8-10 babycorns, boiled and cut to inch long pieces
10 pearl onions
3 dry red chillies
1 tablespoon coriander powder
2 tomatoes, chopped
3 cloves garlic
1 teaspoon chopped ginger
1 teaspoon cumin seeds
Turmeric powder
Salt to taste
Cooking oil

Heat little oil and add coriander seeds and dry red chillies, roast until aromatic and keep aside

Heat little oil in same kadai and add the onions and garlic and fry for couple of minutes

Add the tomatoes and cook until mushy

Add the ginger while keeping the flame off. Keep aside to cool and grind to fine paste

Heat little oil and add cumin seeds and allow it to brown

Add the okra/bhindi/ladies finger and cook until done. Add salt when almost done

Add the ground paste, babycorn and turmeric powder, required salt and simmer

Add coriander leaves and water if needed and simmer for five minutes or until desired consistency achieved

Serve hot!